Unpacking is a game about the familiar experience of pulling possessions out of boxes and fitting them into a new home. Part block-fitting puzzle, part home decoration, you are invited to create a satisfying living space while learning clues about the life you’re unpacking. Over the course of eight house moves, you are given a chance to experience a sense of intimacy with a character you never see and a story you’re never told.
The Beginning
The idea for Unpacking came from a real life love story, when Pixel artist Wren Brier and WitchBeam programmer and founder Tim Dawson decided to move in together. Inspired by the process of opening cardboard boxes, pulling out items and deciding where they belonged, the couple soon started riffing on the idea of how this related to gameplay. Riffing quickly became design and Unpacking was on its way to becoming a real game.
Unpacking has won a slew of awards across every aspect of game making, including Audio. In 2022, Unpacking picked up Game Developer’s Choice Award for Best Audio, pitted against the big guns of AAA titles. So what’s all the fuss about?
Soon after Unpacking’s launch, a tweet from sound designer Francesco Del Pia went viral. The video praised the detail of the Foley and quickly gained over a million views. View Francesco's tweet
One of the responses caught Jeff’s eye…
…and soon after this, the friendly folks at Audiokinetic asked Jeff if he could share some of his processes on their blog. So, here we are.
The Foley was produced by a small family team, led by industry veteran Jeff van Dyck, with his wife Angela and daughter Ella. This relatively small game packs a punch with its attention to detail and clever use of REAPER and Wwise to create and implement a vast amount of audio. This blog is about how the van Dycks managed the Foley production, creating more than 14,000 WAV files and an intense level of detail with a small team.
Audio Concept
At the start, Jeff had a discussion with Wren and Tim about audio styles. In a pixel art game, typically the audio is in a "Chip Tune" style, for both music and SFX to add to the retro pixel vibe. While Jeff thought this would be great for the music, he thought beeps and boops for all of the SFX would be too much chip. He decided that hyper-realistic sound effects would be a nice juxtaposition with the pixel art.
Prototype 1
Once he decided to create hyper-realistic sound effects, Jeff set to work on an initial pass of kitchen items, recording the items in his kitchen at home.
Initially he used a RØDE NT2-A microphone and a TASCAM DR-40 recorder. Both pieces of equipment were replaced in subsequent recordings, for quieter and more sensitive recording. In the end, the team used a Sennheiser MKH 8040 into an old Steinberg MR816x Audio Interface firewired into an even older Macbook Pro.
Notes from Prototype 1:
- Not a lot going on in-game aside from music, so lots of room for Foley detail to be noticed.
- The sound of the natural reverb of the kitchen added realism.
- Sharing of sounds across dissimilar items broke immersion.
This raised a few issues:
- The items can be moved between rooms in the game, so everything needed to be recorded in a dead room, adding the reflections in real time with the audio engine.
- Sharing sounds across items broke immersion, so every item needed to be recorded with multiple variations of place/pickup on every surface in the game.
- What is the overall scope of the game in Foley terms and is it achievable? The answer to this question was still unknown, so Jeff focused on the music while the game developed further.
Prototype 2
Six months later, the game had multiple rooms in it, so Jeff asked his daughter Ella (also a composer and sound designer) if she could help out with some Foley recording during university break. Ella recorded and edited the kitchen items in a dead room (a spare bedroom) across the new multiple surfaces. Ella was soon too busy finishing her university music degree and starting her first solo game soundtrack to continue working on the Foley.
Notes from Prototype 2:
- Props recorded are the actual items in the game.
- Most surfaces are the real surface (tile used tile, carpet used carpet, etc.)
- Some surfaces required improvisation (sink used large metal baking trays turned upside down).
- The scope of the Foley was starting to look huge.
75K WAV files? Nope
At this point Jeff realized a couple of things: he couldn’t do this project by himself, and the design needed to be smart/efficient. He came to the same conclusion a lot of people in this situation come to… Help! I NEED MY WIFE.
Jeff’s wife Angela has an audio and video background. At Electronic Arts Canada, she managed the play-by-play dialog in games like Triple Play and NBA. Managing workflows and processes for massive amounts of data was her thing. “She’s perfect for this!”, he thought.
The first thing they did was some basic math. Based on the game design, they estimated the final game would have a total of 500 different objects which could be placed on 15 different surfaces, and would require 10 variations of each item on each surface, which meant a total of 75K sound files. Was this amount of work doable? The simple answer was “nope.” They needed design ideas to reduce the amount of Foley while retaining the breadth of sound, and needed to create processes to automate and streamline production and implementation.
Efficient Design
The total amount of Foley was reduced from 75K to under 15K using three design ideas.
Generic Soft Surfaces
Ange and Jeff realized that items on soft surfaces often sounded the same. They recorded generic light, medium, heavy and extra heavy objects on soft surfaces like carpet and bed. These were then assigned across the majority of the game items (except for items that had their own unique sounds even on a soft surface, such as cutlery).
Generic Items
Ange and Jeff used generic recordings for similar-sounding items. This involved categories such as glass, metal, ceramic, plastic solid, plastic hollow, etc. and had weighted classes: light, medium, heavy, and extra heavy. These were recorded with a good amount of variations, allowing many game items to share these generic sounds while the overall effect remained natural.
Sweeteners for Unique Sounds
Some of the unique sounding items in the game could be split into two sounds: the sound of the object being placed plus its inherent unique sound. A good example is a piggy bank. The piggy bank is a ceramic object plus the sound of coins rattling. Jeff and Ange identified items that could use the generics they were recording (The piggy bank used a generic ceramic sound which was already recorded across all the surfaces. The coins rattling were recorded on their own. The WAV files were then triggered together.)
REAPER
Ange and Jeff wanted to streamline production by maximizing the features of REAPER and Wwise to automate as much as possible. They also wanted a workflow that was non-destructive (except for noise reduction) and easy to repeat with different audio settings.
REAPER Dynamic Split
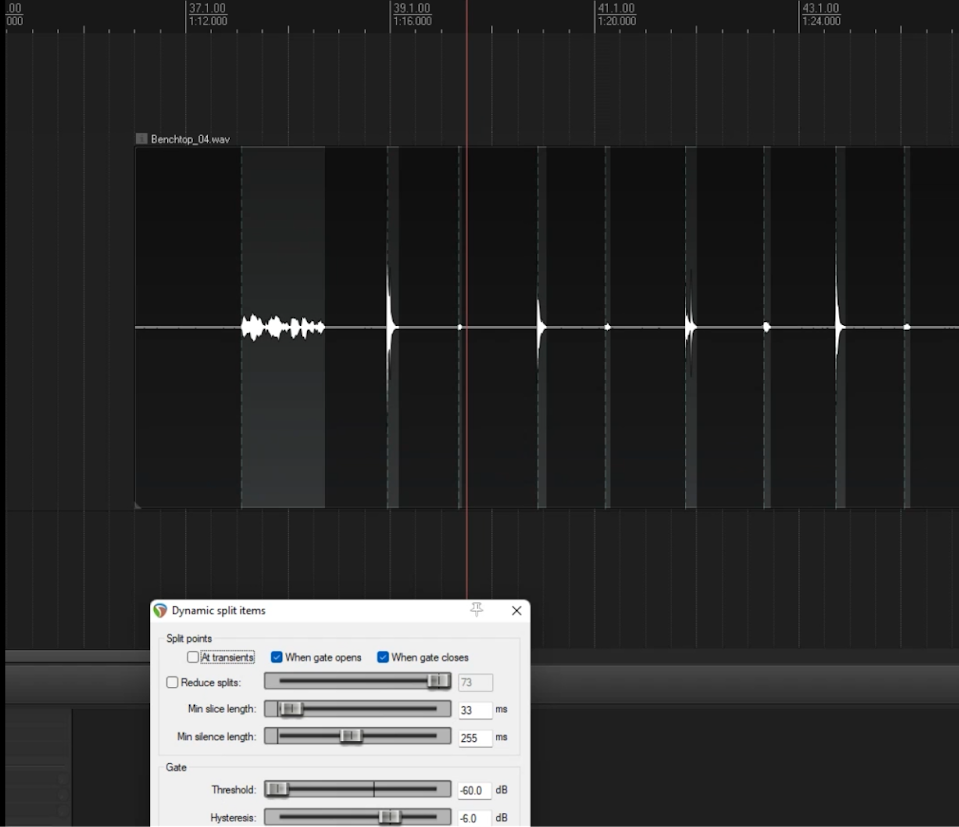
They started with obvious functions like Dynamic Split to automatically split recordings into individual items.
REAPER Layout
The layout of the REAPER project was integral to two streamlining processes: automated file naming and rendering into a folder structure that matched the template layout in Wwise. Ange and Jeff set up the game surfaces vertically (using tracks and child tracks) and game items horizontally (using regions). Each surface track contained two child tracks: place and pickup.
Zoomed-in view of the REAPER layout
region Ceramic Light / track Benchtop / child track Place / child track Pickup
Zoomed-out view of the REAPER layout showing regions, tracks, and child tracks. The region list allowed sorting by column, searching by item, and jumping to a region in the timeline.
Automation on Master Bus for EQ and Frequency Management
Quite often with quiet sounds, having the mic close to the item to be recorded creates a “proximity effect”, and an unnatural amount of low frequencies are recorded. This was easily dealt with by using a couple of high-pass filters (using Fabfilter plugins) at differing intensities. These were enabled as needed through the automation on the master bus. Harsh-sounding recordings were processed with Oeksound’s Soothe2, and sounds that needed more low-end depth had BOOM’s ENFORCER applied.
REAPER Script for Automated File Naming
Ange and Jeff used the project layout of regions/tracks/child tracks to create the following filename convention: item_surface_action_variant#
Using X-Raym’s script for renaming with patterns, the script used region to identify the item, then track to identify the surface, then child track to identify the action (place or pickup), then the variation (or take) number. The script was able to name 14K files in seconds.
REAPER rendering matched to Wwise importing
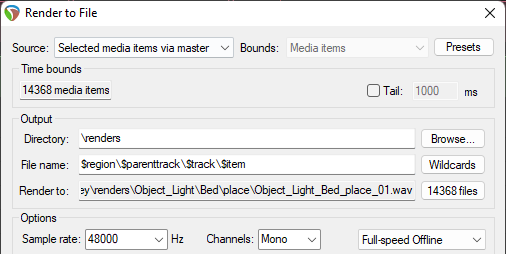
Ange and Jeff designed the REAPER layout with the Wwise layout in mind. They rendered from REAPER to a named and nested folder structure that matched the import template in Wwise. This was magical in terms of automation and reducing workload.
The render output used the “region/track/child track” layout to name and nest folders and WAV files consistent with the import template into Wwise.
Wwise
Wwise Initial Setup
Jeff set up a Wwise switch group called action, which contained switches called pickup and place. Then he set up a surface switch group that contained all the surfaces. How did this all work?
The switches were set by Unity when the Wwise “Play Event” was triggered. For example:
Play Event Shoe_Heavy, Surface = Benchtop, Action = Place
Wwise would then randomize the choice of variants from that container.
Wwise Template for Importing Folders/WAV Files into a Designated Structure
The importing process was streamlined by applying a template to all of the items when imported. The template matched the rendered folder structure from REAPER. The template was a huge time saver, automatically creating all of the surface containers, nested correctly, for every item in the game.
Import Process
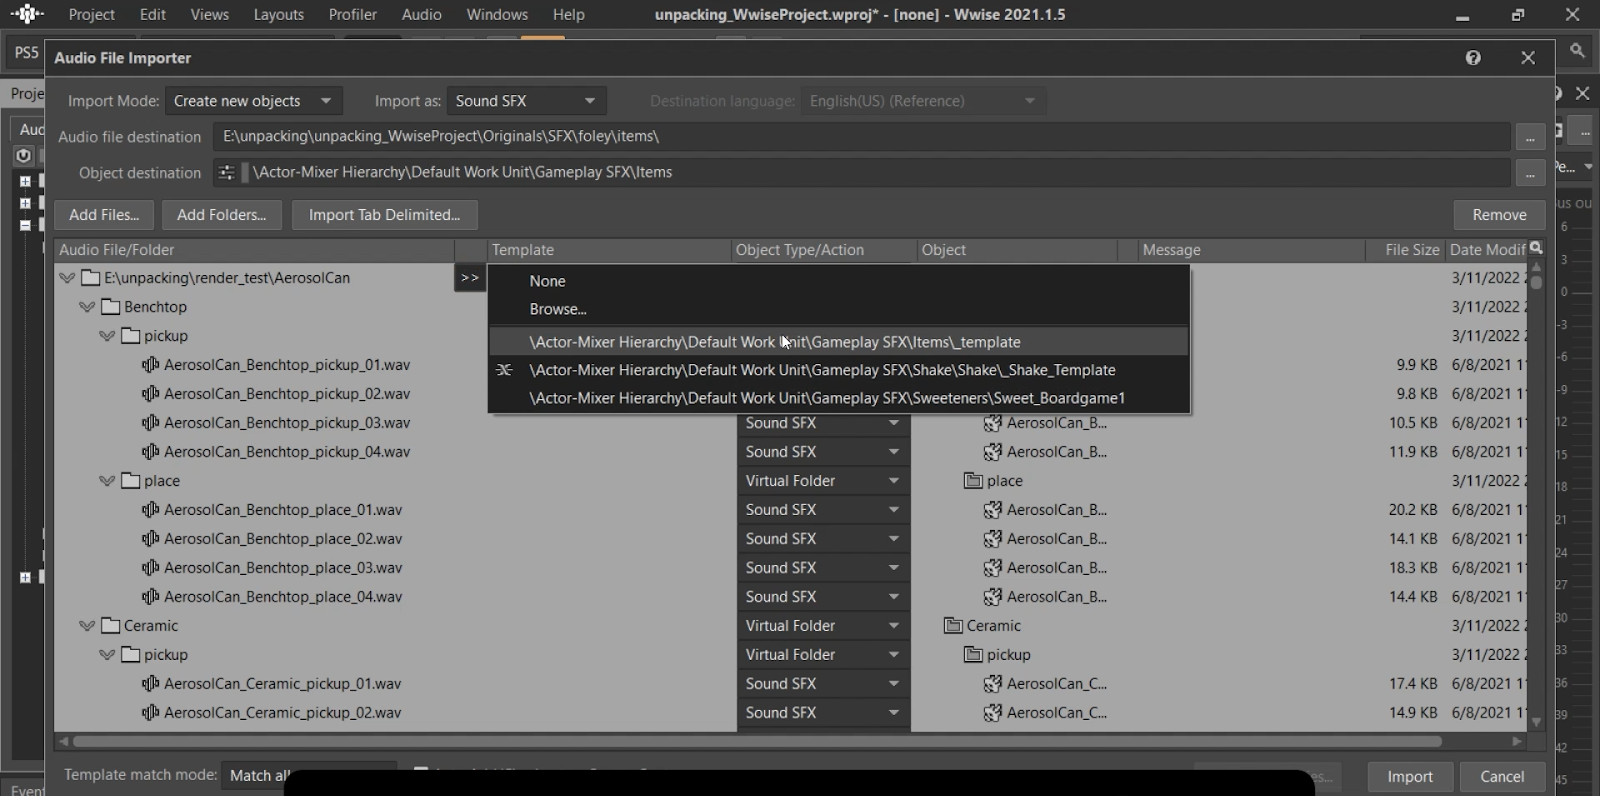
1. Select folders for import (the exported folder structure from REAPER).
2. Apply the template that was created earlier.
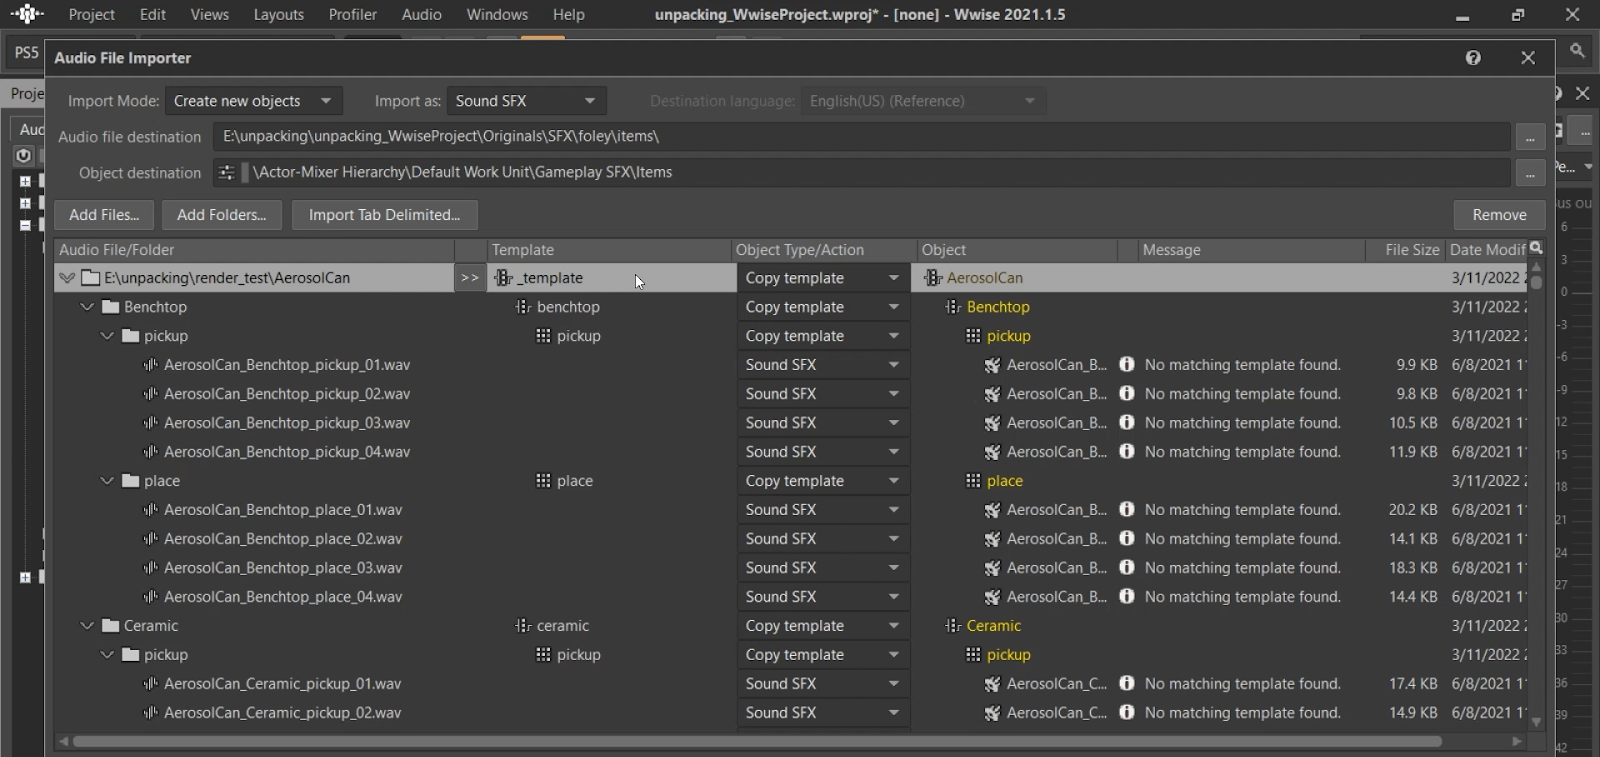
When the REAPER folder structures matched the template, the font on the right side was highlighted yellow, indicating that Wwise had found a matching folder and would then create matching containers.
Once the audio was imported into this container structure, all containers were selected and new play events were created for each item. From here, the switches worked with the play events. The Wwise play event filtered down through the containers through the switches.
The example again, from earlier:
Play Event Shoe_Heavy, Surface = Benchtop, Action = Place
Wwise would then randomize the choice of variants from that final container.
The Google Spreadsheet
Flexibility for Sound Allocation
The project was at the point where all the game items requiring sound were in Unity and all the recorded Foley was in Wwise. However, there were more game items than unique sounds recorded - as you might remember, Ange and Jeff created generic sounds and sweeteners to share across multiple items. This needed to be configured somewhere easy to manage. Another requirement was being able to allocate sounds to game items and hear these changes in real time. Tim created a tool in Unity that would download the data directly from a Google sheet into the Unity project. With one click in Unity, Ange and Jeff could instantly hear changes made in the spreadsheet. The Google spreadsheet gave Ange a lot of autonomy (not relying on programmer time) for experimenting and changing an item’s allocated sound if a particular sound wasn’t working. The ability to spend time finessing sound allocations was the ultimate polish tool for the Foley.
Bespoke Unity Audit Tool
Cross-referencing
The final and very cool addition to the Foley toolset was a bespoke audit tool that was also made by Tim. As the game was built in stages, with new game items and surfaces added at different stages of development, it soon became unruly to keep track of what items had been recorded and on which surfaces. The audit tool was initially built to avoid a massive amount of manual cross-referencing while creating new recording lists. However, its power was extensive, and in different modes could show things such as:
- All surfaces that any game item could be placed on across the entire game
- Missing audio files by item/surface
- Items/surfaces in the spreadsheet using expected allocations or overrides
Shake Shake Shake
Shaking Items in the Game
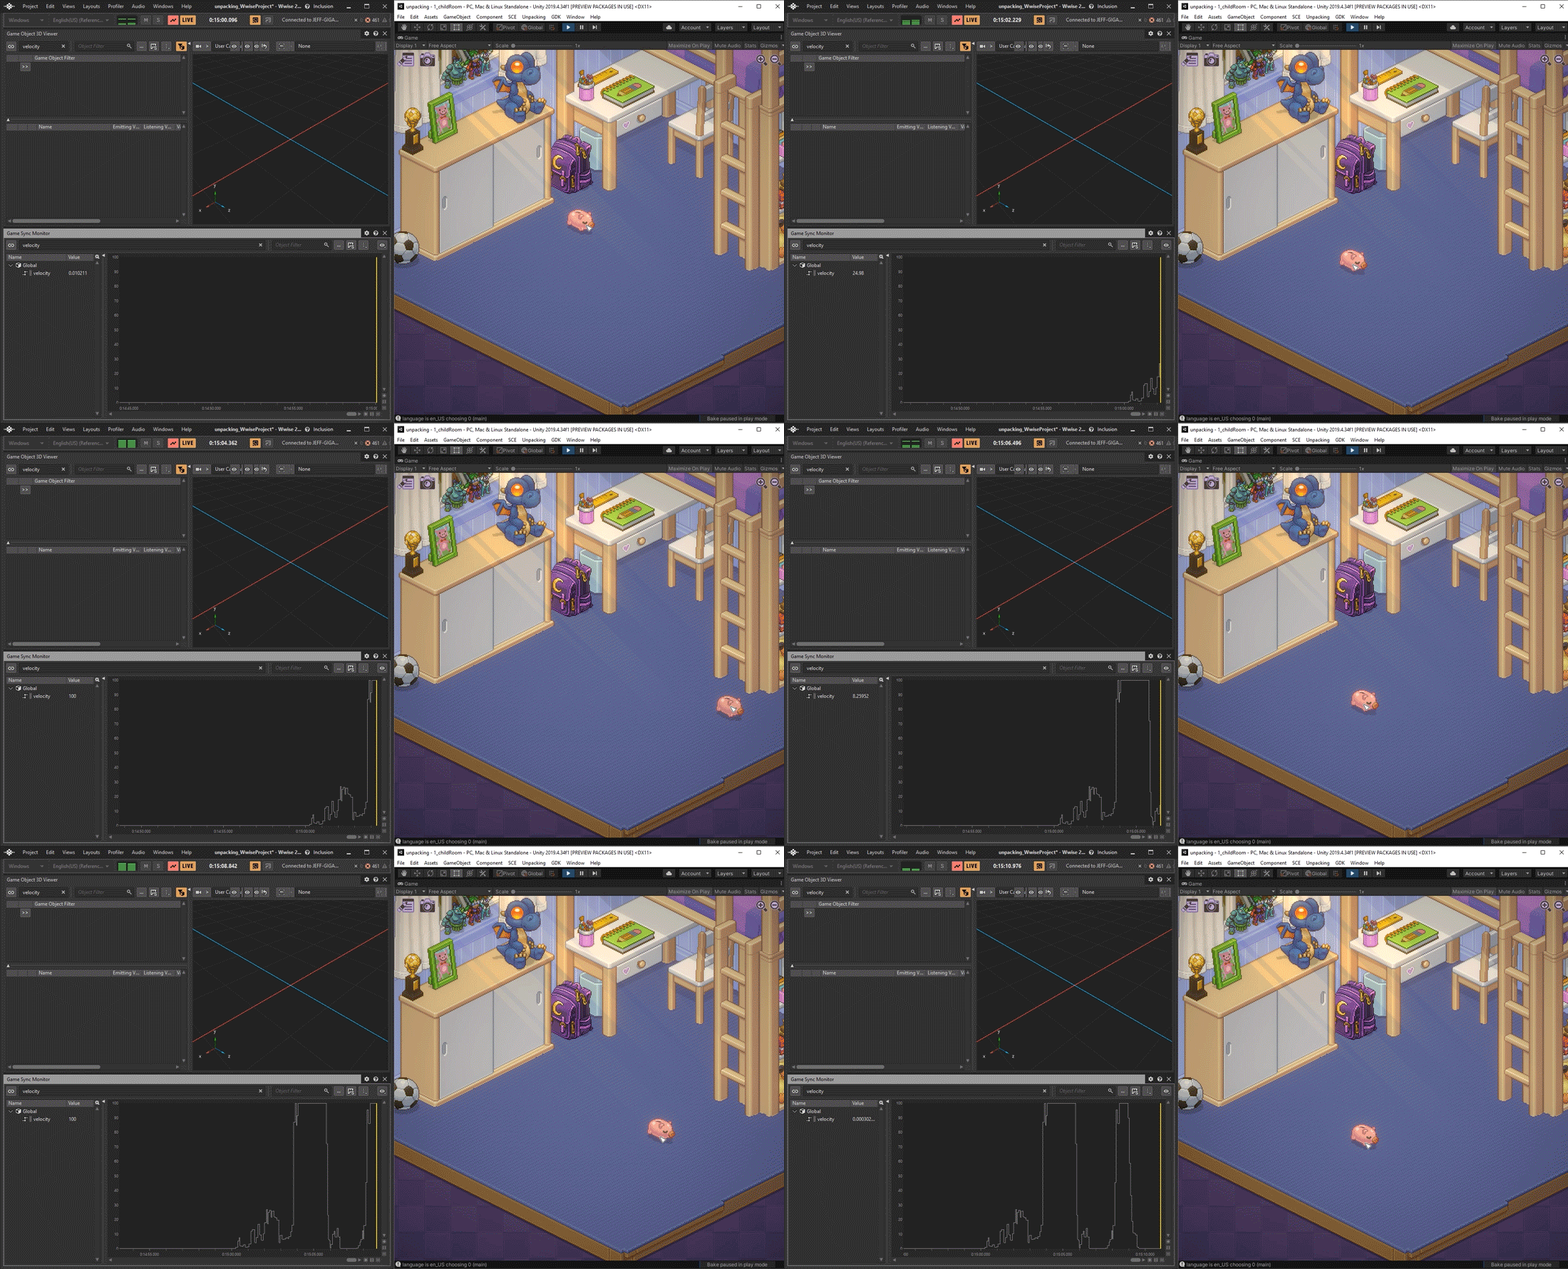
Many game items could be shaken by the player, such as the piggy bank, board games, pencil holder, and water bottle.
Jeff and Ange experimented with the recording and editing process, to make it feel natural and responsive to the player shaking the mouse or controller.
The setup in Wwise worked like this (shown in the series of screenshots below):
The Shake Piggybank Blend Container contains Shake Left, Right, and Stop containers.
The shake is chosen by the direction parameter sent to Wwise from mouse movement code.
Then, within the choice of direction is a switch container that selects the intensity of shake.
The velocity of the mouse movement is sent to Wwise, which then chooses between light, medium or hard shake containers.
In summary
- We recorded a @^#$ huge amount of sounds!
- We found some shortcuts along the way with soft surfaces, generics, and sweeteners.
- We made good use of REAPER and Wwise workflows which kept us sane.
- Validation in Unity provided clarity in chaos.
For more information about the audio in Unpacking, here are some links:
Jeff’s GDC 2022 talk
Level with Emily Reese Podcast
Unpacking Audio Deep Dive
We hope you enjoyed this blog!
Angela and Jeff van Dyck
|
ANGELA VAN DYCK |
评论