Introduced with Wwise 2017.1, 3D busses and auxiliary sends from busses make it possible to use the sound engine in a much more modular fashion, and indeed do some things that Wwise was never originally intended to do. I am going to take you outside the obvious context of using Wwise for creating video game audio and instead explore what is possible with Wwise as a platform for procedural audio design. We will be examining in depth the ability to create feedback loops in the signal path and the consequence this has. I’ll start with a simple example to explain the concept and then guide you through an implementation of an entire reverb effect, created entirely with Wwise busses. I suggest that you first download my Wwise project so that you can follow along, but it's not a problem if you do not.
Feedback in the Mixing Hierarchy
If you create an aux send from a bus to another bus that is lower down in the hierarchy, it is possible to create feedback loops in Wwise. Wwise mixes audio from the leaves of the bus hierarchy and works its way up to the master audio bus. When the sound engine performs a mixing pass, and it encounters a bus with an output connected to a lower bus, this lower bus has in fact already been mixed in the current pass. The chunk of audio passed to the lower bus will have to wait until the next pass to mix into its parent bus; one frame of latency will be incurred in the feedback path, equivalent to 10.6 milliseconds for a standard 512 sample buffer at 48 KHz.
We can demonstrate this by playing a sweeping sine wave into a bus that feeds back into itself. In the Advance Profiler’s Voices Graph we see a red dotted line, which, when we hover the mouse over, indicates the incurred latency in milliseconds.
.png)
When listening to the sine wave sweep, we hear distinct “beats”. These occur because the sine wave changes frequency as it is added to (mixed into) an older version of itself; regions of positive and negative interference occur.
Watch Out!
There are some important things to be aware of when deliberately creating feedback loops in Wwise—something it was not really designed to do. The first of which is that we do not want to create an unstable system. This is when we have a feedback loop that results in a net-positive gain, and can create very loud noises that can damage speakers or ears! Always have a negative gain on any aux send that feeds into itself. You will note that the ‘Interference_Patterns’ bus has a -3 dB gain on its aux send. If this gain were positive, it would surely result in unpleasantness.
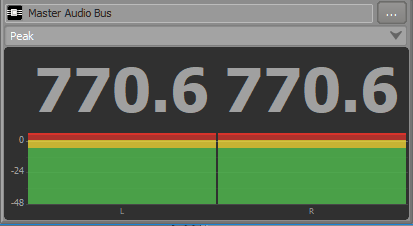
More than a few times while experimenting, I created an unstable system. And the result is usually very loud static followed by silence. Sometimes the sound grows very slowly like a microphone feeding back at a concert. Other times, it blows up instantaneously. The sound engine is essentially trying to play an infinitely loud signal, and ends up playing nothing!
Another gotcha is that there is no mechanism in the sound engine to clean up feedback loops after they are no longer audible. Even in the case of a stable feedback system, the volume decays asymptotically down to zero, but never theoretically gets there. The sound engine continuously mixes buffers of silence (or virtually silent) into itself, and has no mechanism to look into the actual contents of the buffer to determine that it will not be audible.
To get around this, one must explicitly disconnect the send—this can be accomplished by removing the send (click and delete) or just by setting the send volume to -96 dB.
Creating a Feedback Delay Network Reverb in Wwise
Self-interfering sine sweeps are fun and all, but can we do something even cooler? Can we design a fully functional reverb effect in Wwise by patching together the bus hierarchy and auxiliary sends? Yes! Well, sort of. As I will explain, I cheated a little bit, but only a little. I am going to show you how to create a reverb effect in Wwise, without a reverb effect, and hopefully we will all learn a thing or two in the process.
A feedback delay network (FDN) is a type of reverb that is comprised of a number of delay lines. The output of each delay line is fed back into each input, after applying a specific gain. Schematically, it looks like this:
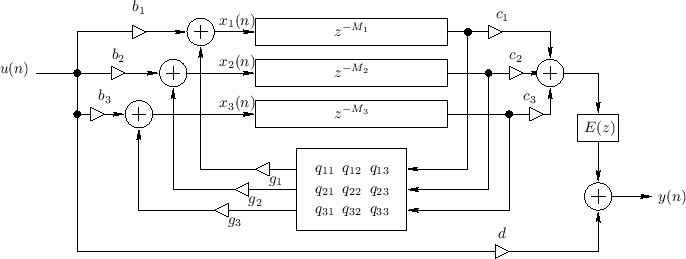
In this example we have three delay lines (labeled z-Mi in the above diagram), and a matrix of values ‘qxy’ which provide the gain for how much of the output of delay line X is fed back into the input of delay line Y.
There are various considerations when setting the values for each of the delay line lengths (Mi) and the values for the matrix of gains, and if you would like to learn more about FDNs, you can read about them on dsprelated.com. The FDN which I implemented in my Wwise project is quite rudimentary, but nonetheless, it is useful for learning about the basic concepts.
FDN Bus Structure
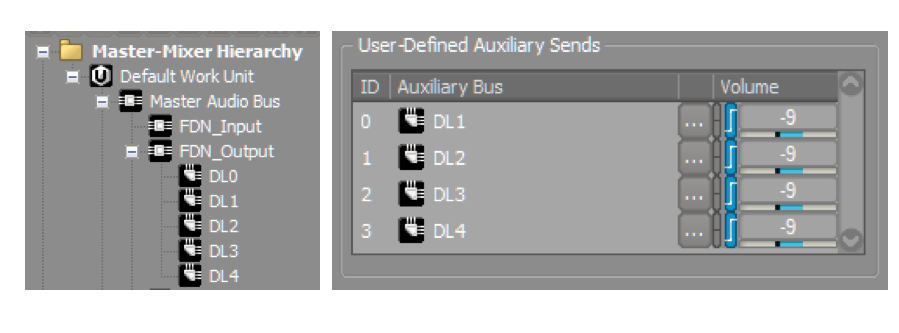
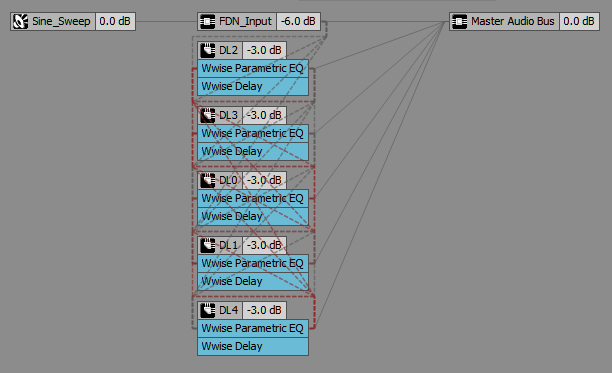
In Wwise, I created an input bus and an output bus for the FDN, and underneath the output bus, I created 5 aux busses for my 5 delay lines. Each delay line bus (eg DL0, DL1, ..) has four aux sends that send to each other’s delay line, forming the feedback loops of the FDN. It is possible for each bus to have up to four user-defined sends, but a bus cannot send to itself, so this is why I decided to have five total delay lines. The input bus (FDN_Input) has four sends that feed busses DL0 though DL3, again because we can only send to four busses at a time. The 5th delay, DL4 gets fed only by the other delay lines, and not the original input signal. The resulting bus structure results in a rough approximation in Wwise of a classic FDN, as pictured above.
Delay Lines
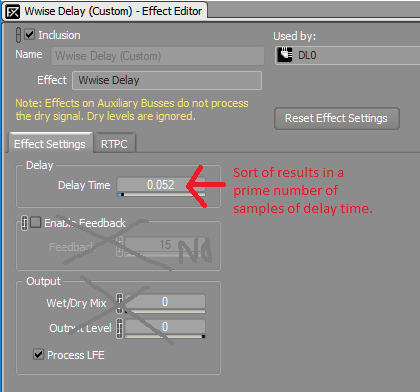
I wanted each delay line to have a different delay time, instead of sticking to the sound engine’s imposed 10.6 ms, so I cheated, just a little, by adding a delay effect (with no feedback) to each “delay line” bus. In order to have a more natural sounding FDN reverb, it is desirable to have delay line lengths that are “mutually prime”, meaning the only number that can evenly divide all of them is 1. After a quick Google search to pull up a prime number table, I chose five of them, subtracted 512 samples, which is the ‘built-in’ delay as previously explained, and converted from samples to seconds. This is the number I entered into the delay length parameter in the Wwise Effect. Did it work? More about this in a moment.
Nobody Can Be Told What the Matrix Is...
Next up, I had to create a ‘matrix’ of gains which define how much output from one delay line is fed back into the input of each of the other delay lines. In my FDN, the feedback matrix is defined by a combination of the auxiliary output bus gains (each set to -9 dB), and an RTPC that is applied to this parameter (which varies across outputs). Ideally, this matrix should reduce correlation in the composite signal as much as possible to generate a smooth output with minimal ringing artifacts. Unfortunately, commonly used decorrelation matrices involve negative gains (for example, the Householder matrix), and it is not possible to induce a phase inversion using the sliders in Wwise! I ended up defining an RTPC called “Feedback_Vol”, which modulated the gain slightly differently for each set of four aux send output volumes on each delay line bus. The screenshot below shows my curves. Note that 0 on “Feedback_Vol” maps to -200 dB, in order to completely disconnect the sends and kill the feedback loops. (This came in use several times when I accidentally caused positive feedback!)
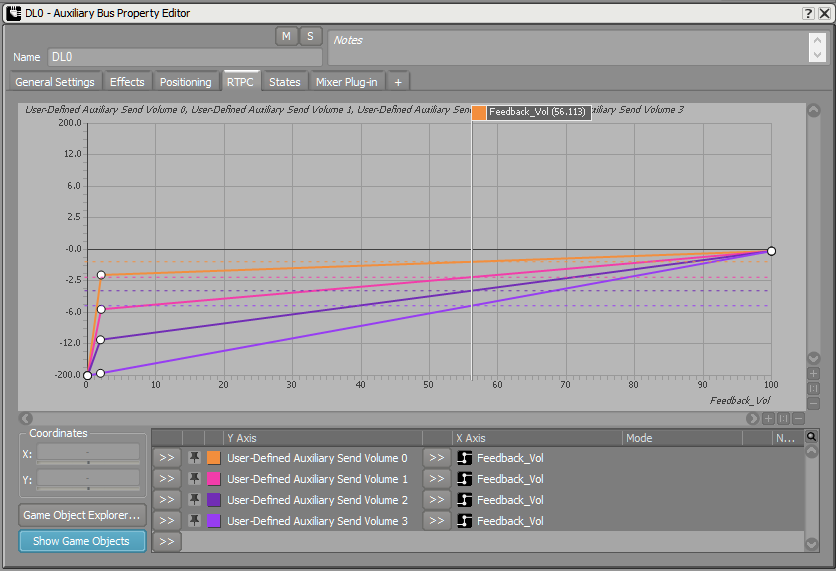
The only difference in the RTPC tab between each delay line bus is that I randomized the order of curves. As the “Feedback_Vol” parameter is reduced, you get sparser echoes that decay faster. Increase the parameter, and you get a much denser reverb that decays quite slowly.
Dampening
Lastly, in order to have high frequencies decay faster than low frequencies (a physical property of real rooms), I added a low-pass filter to the Effect chain of each bus. I hooked up a “Lowpass_Freq” RTPC to the cutoff value. In a future release of Wwise, we will have low-pass filters built directly into each mixing bus, but until then a Wwise parametric EQ with only one band enabled will suffice.
It is now time to play a sound and listen to the fruits of our labor. If we capture it in the Advanced Profiler we get the resulting voice graph. What a mess!
Okay, So How Does It Sound?
Not too shabby for a reverb effect hacked together with knick-knacks from the virtual spare parts bin. Admittedly, it is a bit robotic and ringy at times, but I call it digital lo-fi charm. I was hoping that my clever use of prime numbers would result in smoother output, but in an effort to check that the floating point delay-time was accurately converted to a prime number of samples, I noticed that the Wwise delay Effect internally rounds the delay length to a multiple of four! Sure, this allows for incredibly efficient processing using SIMD instructions, but it destroys my dream of having mutually prime delay lengths. I expect the lack of a proper decorrelation matrix is also a severe detriment to the sound quality.
I expect that many of you are reading this on your smart phones and are unable to download the Wwise project, so here are some audio samples to listen to. In each example I am modulating the ‘Feedback_Vol’ and ‘Lowpass_Freq’ game parameters.
Hello
Hey
Percussion Loop
Sine Sweeps
Yell
All the same, I encourage you to try it out. Try modifying the delay lengths, feedback gains, and such. But, be careful, it is very easy to create instability! Sliding the “Feedback_Vol” parameter all the way to 0 is your “panic switch”. Doing so will cut all the feedback and disconnect the sends.
And in Reflection...
By allowing the ability to create feedback loops in Wwise, we are, in a manner of speaking, allowing users to shoot themselves in the foot. As explained, there are a lot of things that can go wrong and arguably not that many real world use-cases for creating loops. However, using busses as fully patchable modules in Wwise allows for so many alluring possibilities, and being the audio nerds that we are, we could not pass up on the opportunity. Furthermore, allowing feedback loops is aligned with our goal of making Wwise more open with fewer arbitrary limitations. Instead of prescribing a single way of doing things, we want to open the door for creativity and innovation. I hope this feature proves useful and I look forward to seeing what else you, the community, can create with it.


댓글
Matthew Florianz
October 18, 2017 at 09:58 am
User-Defined Auxiliary Sends (on a bus level) is a really welcome addition indeed (*). I like your creativity in (ab)using it : ) Do you have any thoughts about performance? Assume it doesn't require additional decodes, but wonder about engine memory usage. * We has used the aux-send feature to feed a top level bus tree, specifically created for wwise metering . In that tree there are sub busses for different combinations of game audio, receiving input from the appropriate busses in the game mixing structure. We’ve not yet hit the limit of four sends per bus ; ). An EQ/lowpass on that "metering-bus-structure" prevents any audio mixing back into the main mix. Before aux-busses we had metering and mixing on the same level; resulting in a much more convoluted set-up (Think > "SFX (adds to metering)" / "SFX (doesn't add to metering)" ). Never considered your creative approach, thanks for sharing that!
Troy Morrissey
October 18, 2017 at 10:23 am
SWEET! This is the kind of thing I want to Wwise for! S&G's! Thanks for sharing Nathan!
Martin Bussy-Pâris
October 18, 2017 at 10:37 am
Nice one! Wwise being open is one of the great things about it :)
Nathan Harris
October 23, 2017 at 03:29 pm
Hi Matthew! Thanks for the comment and I am glad you enjoyed the article. In these kind of scenarios there are not any specific performance concerns. You incur the CPU cost of mixing for each connection (think lines in the voice graph), and the RAM cost of a buffer of audio, however these cost are usually quite small compared to decoding (usually the main CPU-sucker) and plug in DSP effects.