Intro
Earlier this year, I released an album of generative ambient music called Púrpura. In this article, I will talk about how I used Wwise to make this album—from using the Actor-Mixer Hierarchy to create a generative music system all the way to using Unity to perform the music.
If you’re not familiar with the concept, generative music is essentially music that’s composed in real time by having a system improvise on a set of rules defined by the composer, with varying degrees of randomization. At its most basic, the rules of a system can define which notes (or samples) can be played along with the interval of time it should wait between notes. If you’re curious to learn more about it, I recommend reading this transcript of a talk given by Brian Eno.
Púrpura’s Generative System
All pieces in Púrpura use a similar system to generate them. Each piece is made out of four to five instruments, with each instrument containing a pool of phrases that are played back randomly. I set this up within the Actor-Mixer Hierarchy by creating a parent Actor-Mixer object for each piece with a Random Container for each instrument inside the parent.
In the image below we can see that the piece Rito has five instruments: a bass, a cello, a flute, a granular pad, and an organ. We can also see that the granular pad has a total of seven phrases that are played back randomly.
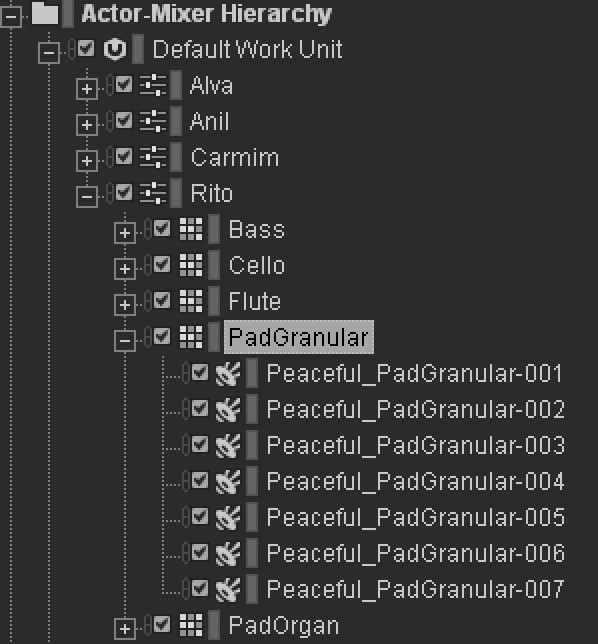
Fig. 1 - Actor-Mixer Hierarchy for Rito
Each Random Container is set to play continuously and loop infinitely, with the transition type set to Delay. This makes it so that when the Random Container is played, it will randomly select and play a phrase, wait a certain amount of time after the phrase ends, and then randomly select and play another phrase—repeating this process until it’s told to stop.
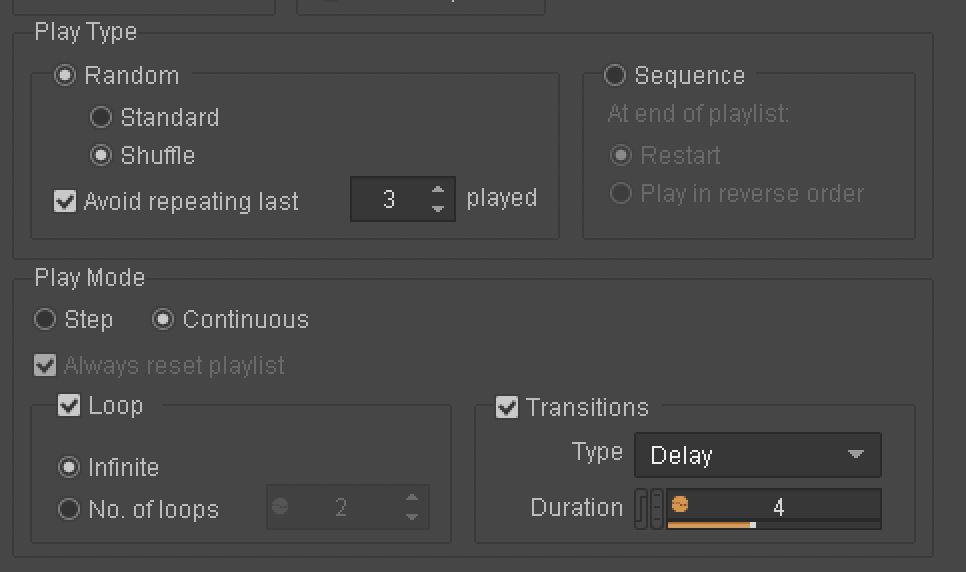
Fig. 2 - Random Container Setup
To add an extra degree of randomness, the delay duration is also randomized.
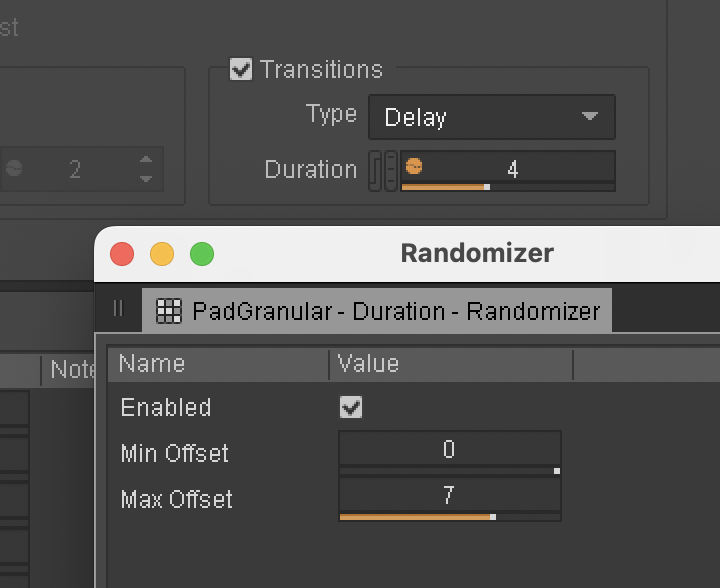
Fig. 3 - Delay duration randomization
If you have ever used Wwise to implement intermittent ambient sounds in a game, this is basically the same setup.
One of the main things I was concerned with when creating this album was making it so the sonic density of each piece varies organically over time, with the goal of giving the music enough room to breathe without it turning into stale silence. Getting that right was both a matter of fine-tuning values in Wwise and a matter of iterating on the musical material itself, making sure that each piece was written in a way that lends itself well to the system.
The pieces were then ‘performed’ in Wwise by simply playing each Random Container simultaneously and letting it run for as long as wanted. Recording the performance was just a matter of creating a track in my DAW with the input set to my audio interface’s output—and of course, turning off monitoring to avoid a feedback loop. I recorded several takes of each piece and compiled the ones I liked best into the final album. Here’s the opening track so you can hear how everything works together:
Alva: Intensity RTPC
The first four pieces of the album use essentially the same system described above, but the finale, Alva, takes it further by using an RTPC to control its intensity level over time. Alva was made exclusively out of samples from the previous pieces of the album, which were mangled and processed to create a sonic collage. It also features Wwise Effects being used to create new textures dynamically throughout the piece. Here’s a link so you can listen to it:
There are a few changes to the setup of this piece compared to the others. First of all, this one uses the Interactive Music Hierarchy to loop a cello phrase throughout its duration, serving as a foundation for the instruments played from the Actor-Mixer Hierarchy. The Playlist Container plays an intro phrase once before moving to the looping phrase.

Fig. 4 - Music Playlist setup
There are also changes to the Actor-Mixer Hierarchy setup. There are four instruments here: a sub-bass, a cello, a flute, and an oboe, with an extra Actor-Mixer object parenting those last three instruments so they can be processed separately from the bass.
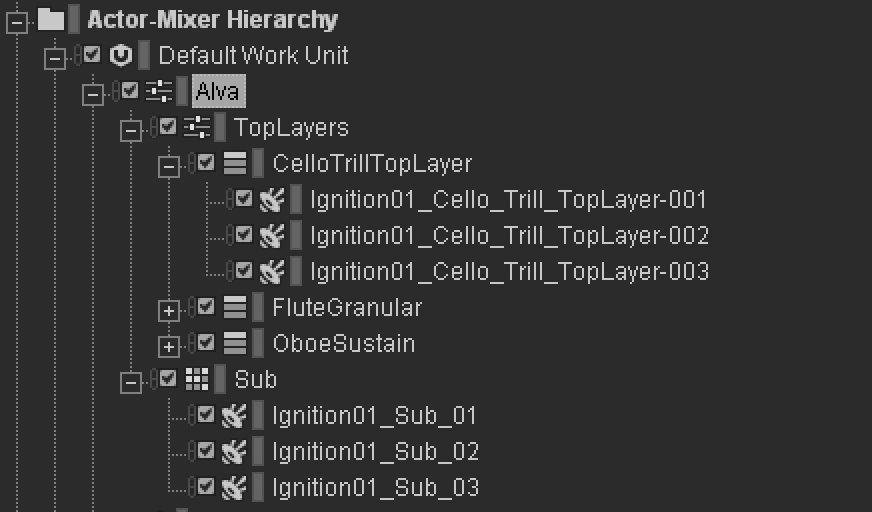
Fig. 5 - Actor-Mixer Hierarchy for Alva
The piece starts with just the cello from the Interactive Music Hierarchy playing and uses the intensity RTPC to fade in the Actor-Mixer instruments one by one. Here’s how it’s set up with the sub-bass instrument:
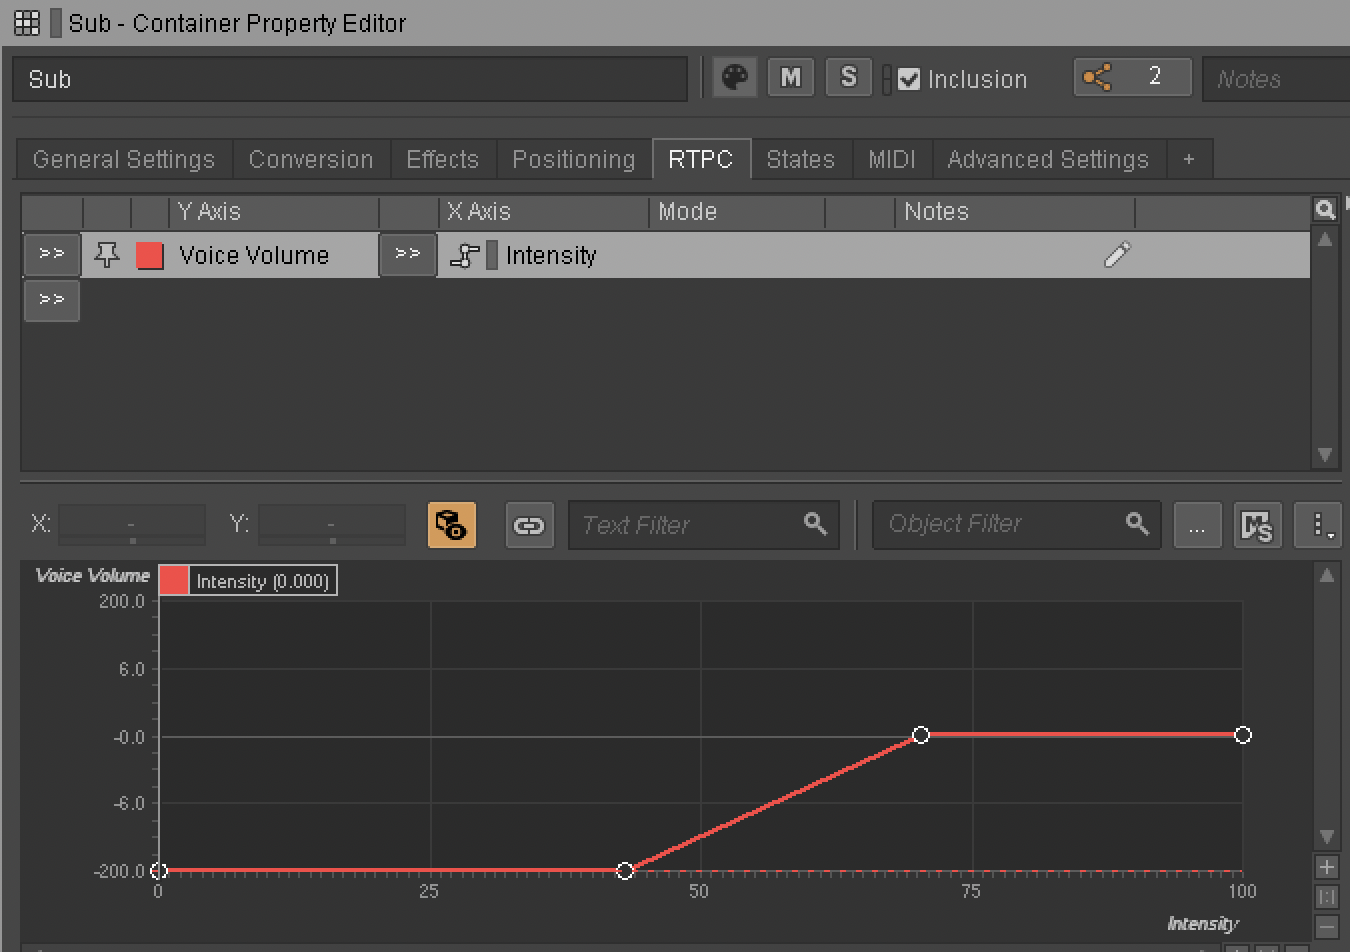
Fig. 6 - Intensity RTPC: Voice Volume
The cello, flute, and oboe in the Actor-Mixer Hierarchy are processed in real time with a Wwise Harmonizer and a Wwise Guitar Distortion Effect. The intensity RTPC controls the Dry and Wet levels of the Harmonizer and the Distortion Drive of the Guitar Distortion Effect. Here’s the RTPC curve for the Harmonizer:
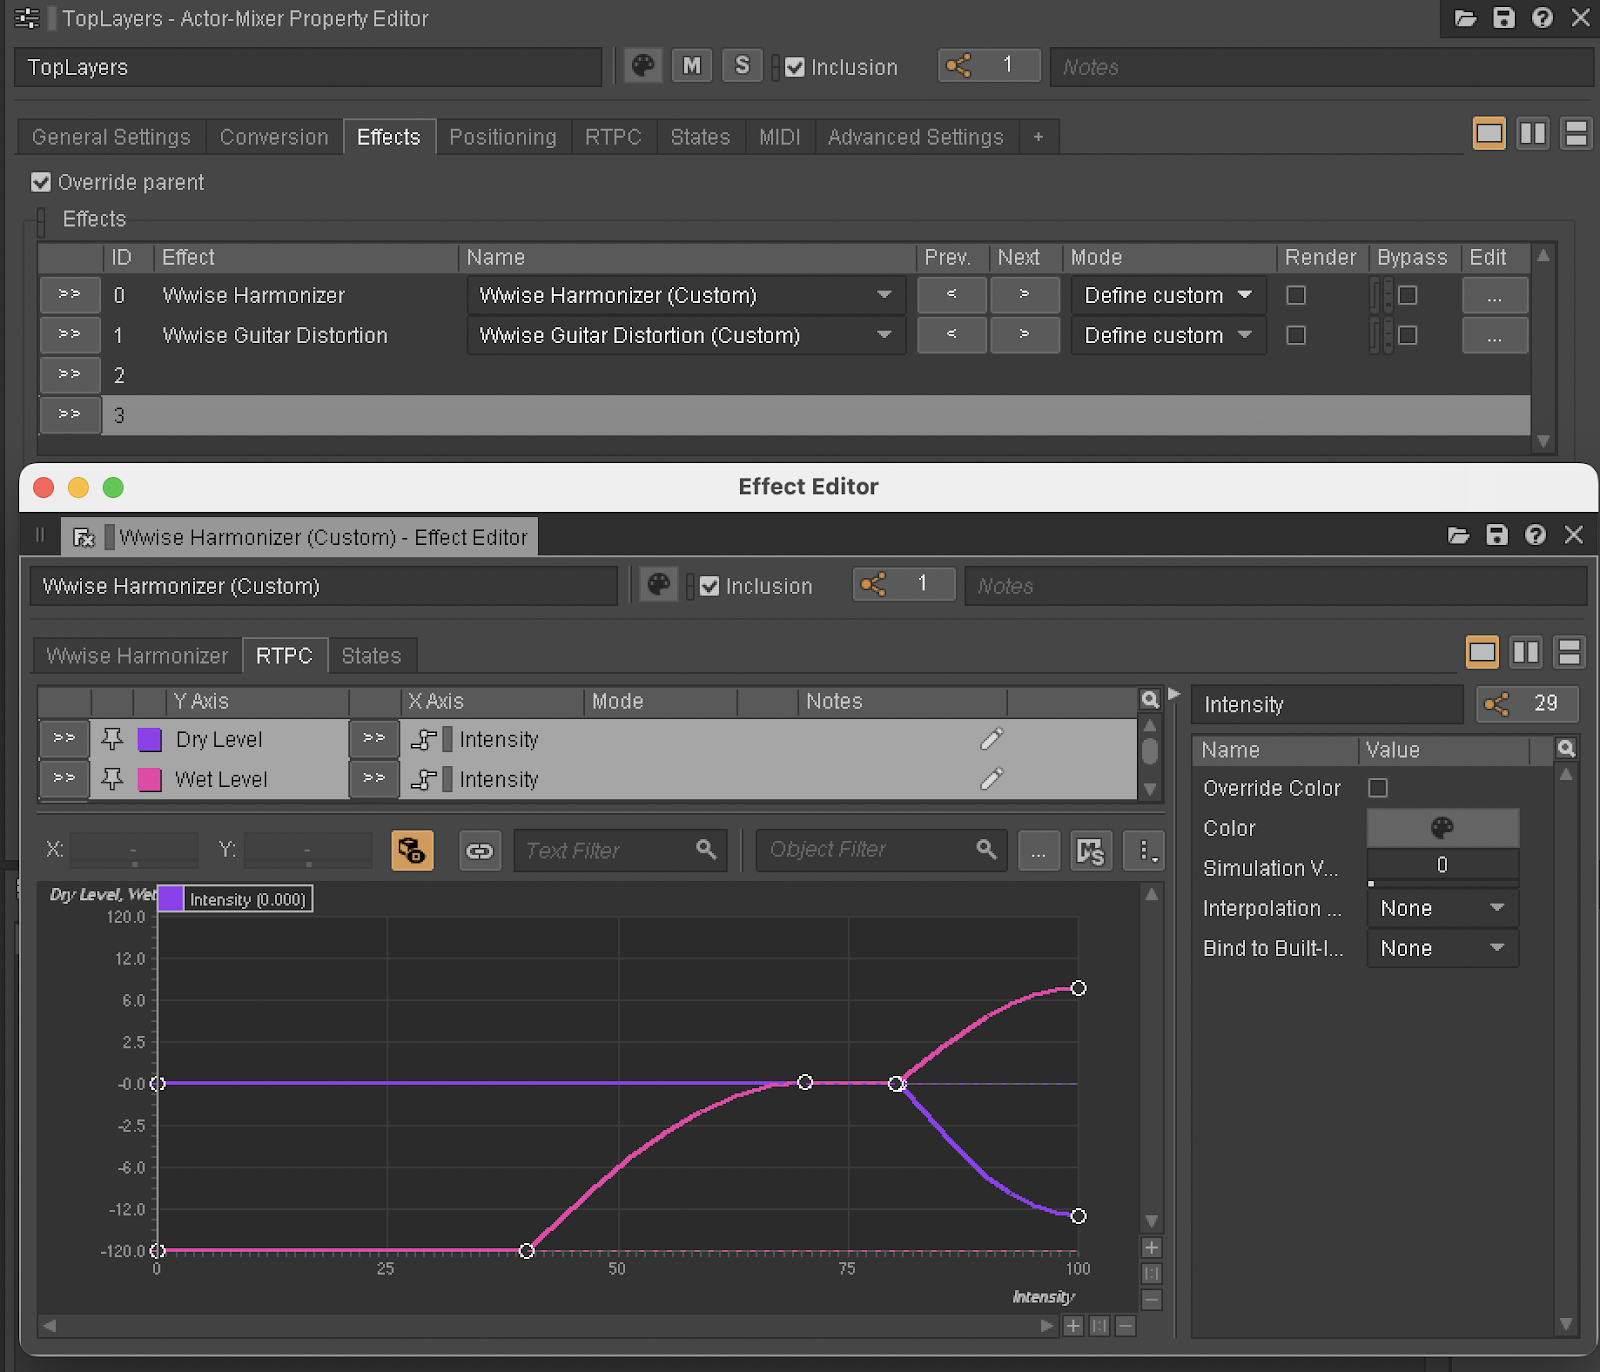
Fig. 7 - Intensity RTPC: Harmonizer Effect
The cello in the Interactive Music Hierarchy has the same two Effects applied to it, with similar RTPC curves. The sub-bass also has its own Harmonizer and Guitar Distortion Effects being controlled by the intensity RTPC, set to different values. It also has a Wwise Tremolo effect added on top of everything that uses the intensity RTPC to increase the LFO Frequency:
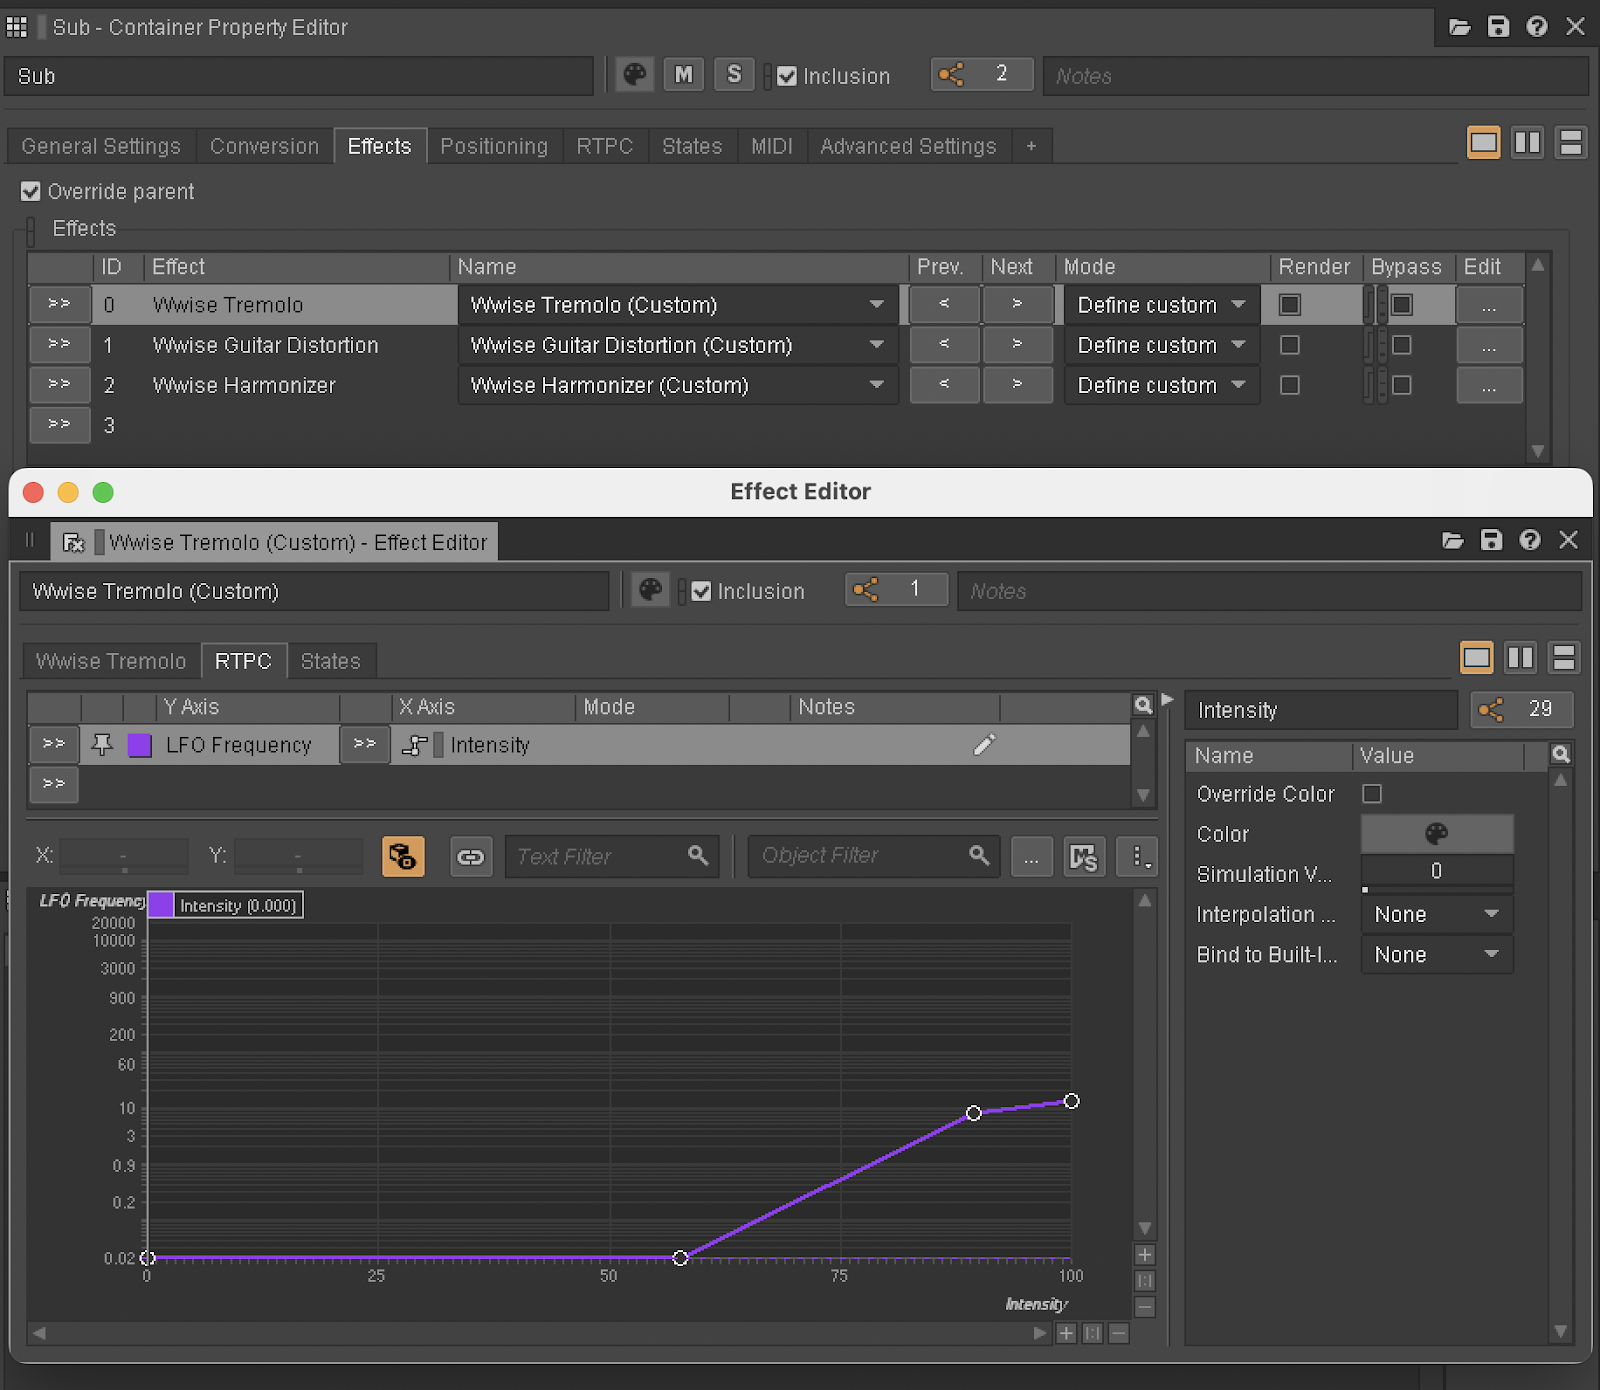
Fig. 8 - Intensity RTPC: Tremolo Effect
The whole album makes use of the Wwise Delay and the Wwise RoomVerb Effects set as two aux busses in the Master-Mixer Hierarchy to give everything a cohesive sense of space. While the aux send levels in the other pieces remain static, the intensity RTPC for Alva controls the User-Defined Auxiliary Send Volume of the Actor-Mixer instruments, ramping them up as the piece progresses.
The final piece of the puzzle is the setup of the Random Container objects. The flute, oboe, and cello instruments are set as a Sequence Container (instead of a Random Container) with the transition type set to Trigger Rate (instead of Delay).
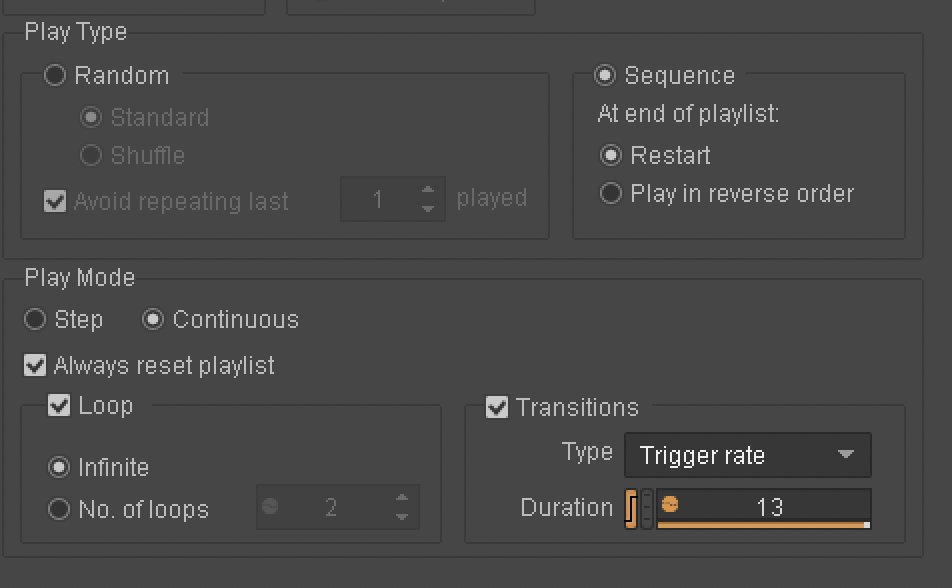
Fig. 9 - Sequence Container setup
The intensity RTPC is then used to control the Trigger Rate, making the Sequence Containers trigger each instrument faster as the piece progresses.
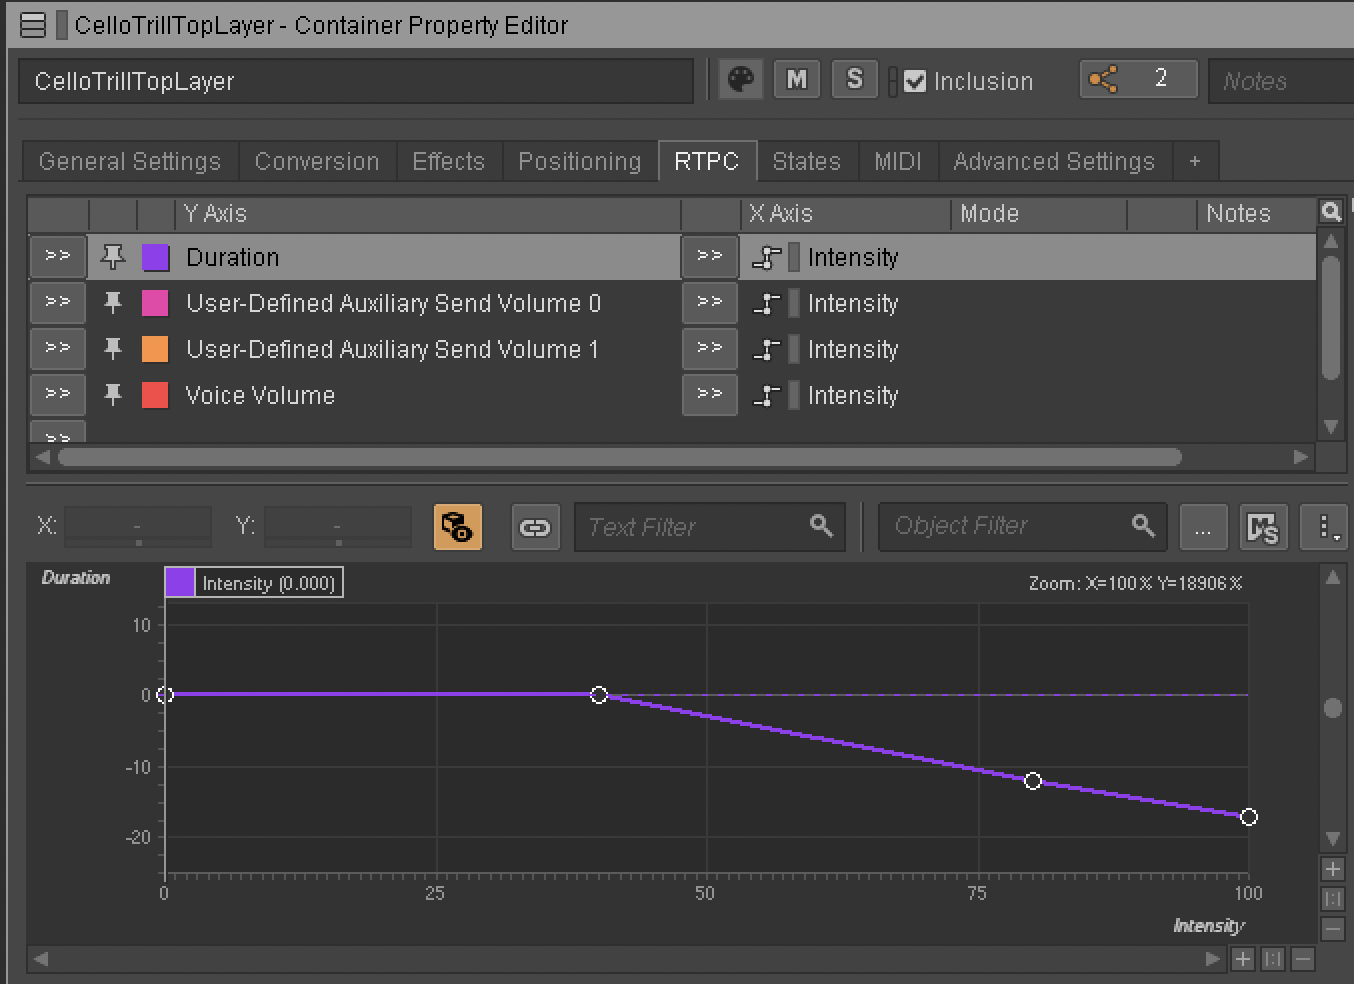
Fig. 10 - Intensity RTPC: trigger duration
By the end of the piece, the Trigger Rate is set so the Sequence Containers are playing one phrase every second, making each instrument stack together upon itself continuously. This, combined with all the Effects being controlled by the same RTPC, morphs what once were separate instruments into an ethereal cloud of sound.
Using a Unity Animation Curve to Perform the Intensity RTPC
After setting up Alva in Wwise, the last problem I had to solve was how to increase the value of the intensity RTPC in a musical manner. Setting the value by hand while recording proved to be cumbersome and unreliable. Setting the RTPC interpolation to a slew rate in Wwise didn’t give me the nuance I needed. I ended up integrating Wwise into a blank Unity project and using an animation curve to drive the RTPC.
It’s called an “animation” curve, but it’s really just a graph that defines a value (on the Y axis) over a duration of time (on the X axis). This is the curve I settled on to drive the intensity RTPC for Alva:
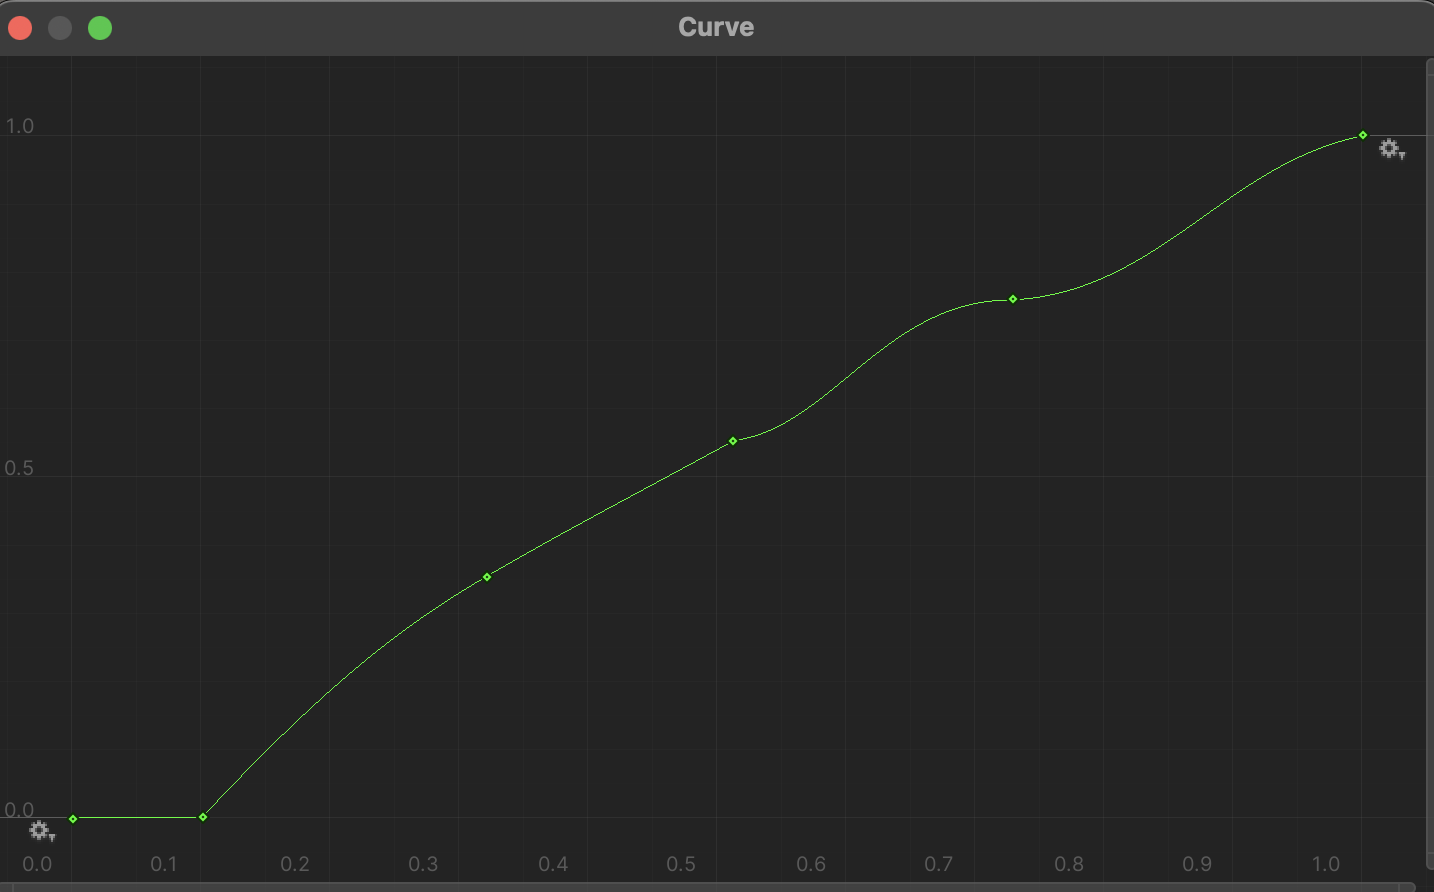
Fig. 11 - Animation curve graph
To hook everything together, I wrote a short C# script to pass the values of the animation curve into the RTPC in Wwise. I first declared variables for the animation curve itself, for the RTPC, and another variable to define how many seconds it would take to go from the RTPC’s minimum value to its maximum.

Fig. 12 - C# script: public variables
I declared those as public variables so I could set them in the inspector. The animation curve can then be edited by hand by clicking the graph symbol there.
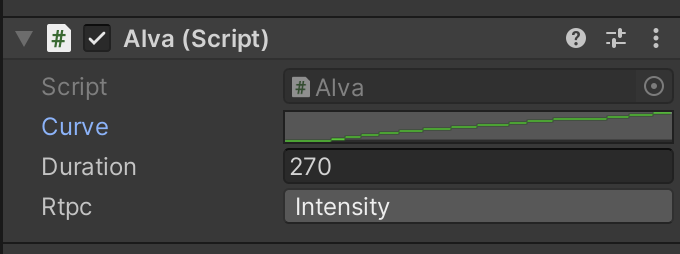
Fig. 13 - C# script: inspector
As figure 11 shows, both the X and Y axis of the curve are normalized to a range between 0 and 1. The next step then was scaling the X axis to the duration of time I wanted (270 seconds) and the Y axis to the RTPC range defined in Wwise (0 to 100). This was achieved with the three lines of code shown below, which are running inside the Update function, so they are calculated every frame:

Fig. 14 - C# script: update function
The first step was to create a timer variable, incrementing it with Time.deltaTime every frame to count how many seconds have passed since the start of the piece.
Next, I needed to use the timer variable to get the Y value out of the curve as time passes. I used the Evaluate function, which outputs the Y value of the graph when you give it the X coordinate as an argument. I passed in the timer variable as the argument, making it so the value of X is incremented every frame, and divided it by the duration variable, making it so it takes 270 seconds to go from 0 to 1.
The next step was scaling the Y-axis value to be compatible with the RTPC value range. I used the Mathf.Lerp function to use the Y-axis value (obtained with the Evaluate function) to interpolate between 0 and 100. The result of that calculation is then written to the rtpcValue variable.
The final step was simply passing in the rtpcValue variable to Wwise using the SetGlobalValue function.
Outro
Púrpura was born as an exercise on integrating Wwise into my compositional process itself, using it to help make music rather than just to play music. Implementation can often be viewed as something that happens to the music after it’s written, but I believe incorporating audio middleware into the creative process itself can help us create more unique experiences for interactive mediums.
Púrpura is available on Bandcamp and on music streaming services if you want to listen to the whole album.


댓글