This is the second part of a two-part blog series; the first part covered the pre-production of ReaWwise, while this second part will go through the development of the extension.
With close-to-final user interface designs and multiple iterations done to validate assumptions made about the WAAPI-Transfer code base, it was time to make some decisions on the technical foundations for the project.
Programming Language
REAPER supports several programming languages for script writing (Lua, EEL, Python, and C++). C++ was chosen over the other languages for several reasons:
- The C++ expertise available in the Audiokinetic team
- Reuse of existing code
- The WAAPI C++ client
- No reliance on languages that are coupled with REAPER, such as REAPER’s flavor of Lua
- No reliance on runtime dependencies such as an interpreter for Python scripts
- Potential reuse from other open source projects such as WAAPI-Transfer
- No dependencies on other ReaScripts (potentially for the GUI)
Framework
After deciding which language to use, it was time to look at which framework would be best suited for the project. The following criteria were used to make the decision:
- Needs to be cross-platform (Windows and Mac)
- Needs to have solid community support
- Fully themeable and customizable
- Use of modern programming patterns and paradigms
- Align closely with company coding standards
WDL/Native
This route seems to be the most commonly taken for C++ based REAPER extensions. It allows you to build user interfaces within the context of OS-hosted windows. It also provides SWELL, which allows you to use a subset of the Win32 API on Mac. This is important for cross-platform compatibility.
During the early stages of development, we used the WAAPI-Transfer code base to validate certain ideas. We quickly realized that there was quite a bit of Win32 API usage that was not supported in SWELL. This caused several issues with cross-platform compatibility and meant that certain graphical components could not be used.
With SWELL, using native components on Mac meant that the look and feel between Mac and Windows would not be exactly the same.
Another drawback with the Win32 APIs is that it is a notoriously difficult API. It’s written in C and has been around for ages. The requirement to keep it backwards compatible also means that a lot of legacy artifacts are still lying around.
JUCE
JUCE is a cross-platform C++ framework commonly used to create audio-related applications and plugins. It has a modern and consistent API, it’s extremely customizable, and has a ton of community support around it. It also has native support for CMake, which we will discuss in detail later in this article.
I didn’t come across any open source, JUCE-based, REAPER extensions in existence. But there were a few snippets of code around proving that implementing JUCE in a REAPER extension was possible and quite simple!
After working a little in the WAAPI-Transfer code base, it became apparent that most of the UI would have to be re-written due to how different the new UX was. Since the drawing of JUCE components is easily accessible and overridable, it was easy to get the vanilla JUCE components to look exactly as planned in the design.
The event handling system is also more intuitive than using the Win32 event handling system directly. Events are managed inside the components themselves. We don’t have to manage the complexities of the windows message loop because it is abstracted away by JUCE.
Another plus for JUCE is that object-oriented programming lends itself well to GUI application development. Different GUI components can easily be represented as objects, each exhibiting functionality in the form of functions. This doesn’t happen as naturally with the Win32 API. Components are defined as structs. More care needs to be taken to organize code in the same way that it would be done using JUCE.
Project Organization and Structure
Before looking at the project structure, I'll briefly introduce CMake.
CMake
The ReaWwise project does not contain any build files. It instead uses CMake. CMake allows us to describe how the project should be built in a generic way. CMake can then be used to generate the platform-specific build files.
There are several advantages to using CMake:
- No need to maintain a different build file for each build environment
- Has helper functions to find system libraries
- Can generate build files for a wide variety of systems
- Can perform additional tasks such as file manipulation and executing shell commands
Project Structure
The intention from the beginning was to try to separate concerns as much as possible. For this reason, the code base is organized into the following four main projects:
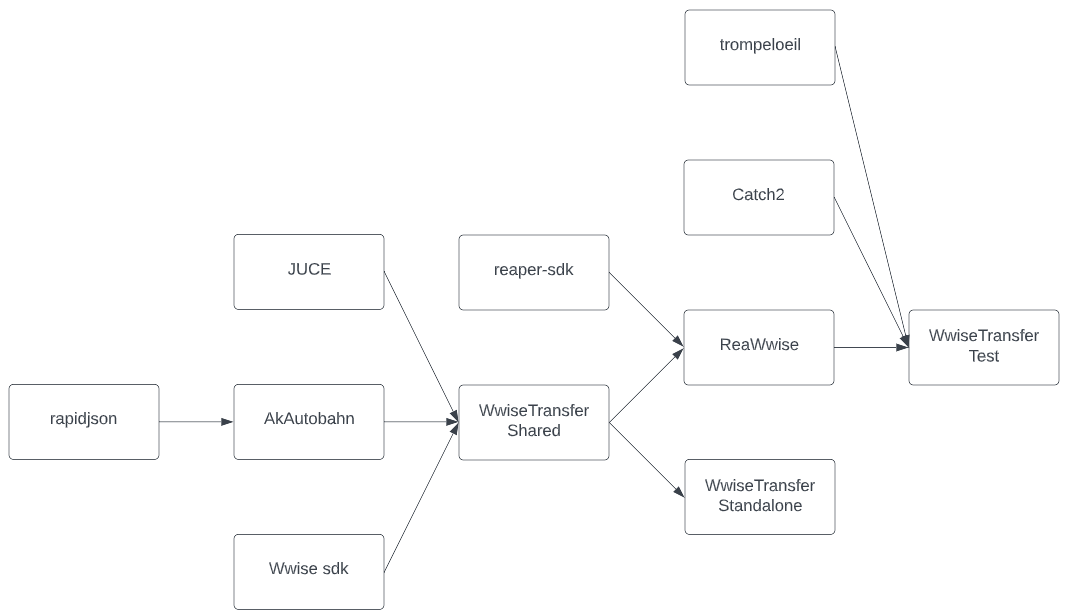
ReaWwise (src/extension)
This project contains all of the REAPER-specific code. It defines the extension entry point and makes all the required calls to the extension API. It also contains code that exposes WAAPI to Lua for use by other extensions. This project is compiled as a shared library and produces the actual extension file (reaper_reawwise.dll) that is imported into REAPER.
WwiseTransfer_Standalone (src/standalone)
This project contains code to launch ReaWwise as a standalone application. It’s mainly used for GUI development and testing. There is no connection to REAPER. The data expected from REAPER is mocked.
WwiseTransfer_Shared (src/shared)
This project contains all of the core components and GUI elements of the application. The code is compiled as a static library and is used as a dependency by the extension and standalone code.
WwiseTransfer_Test (src/test)
This project contains all code related to testing.
Dependencies
Third Party
- Catch2: Testing framework
- JUCE: Application framework
- rapidjson: A dependency of the WAAPI client
- reaper-sdk: REAPER API headers
- trompeloeil: Mocking framework
The last dependencies are AkAutobahn (C++ implementation of the WAAPI client) and some headers from the Wwise SDK. These are not part of the code base and are acquired separately through the Audiokinetic Launcher.
Here is a diagram that shows how the different projects and dependencies are linked together:

Application Architecture
In this section, we'll go over some of the main components of ReaWwise and take a look at how they work.
Preview Panel
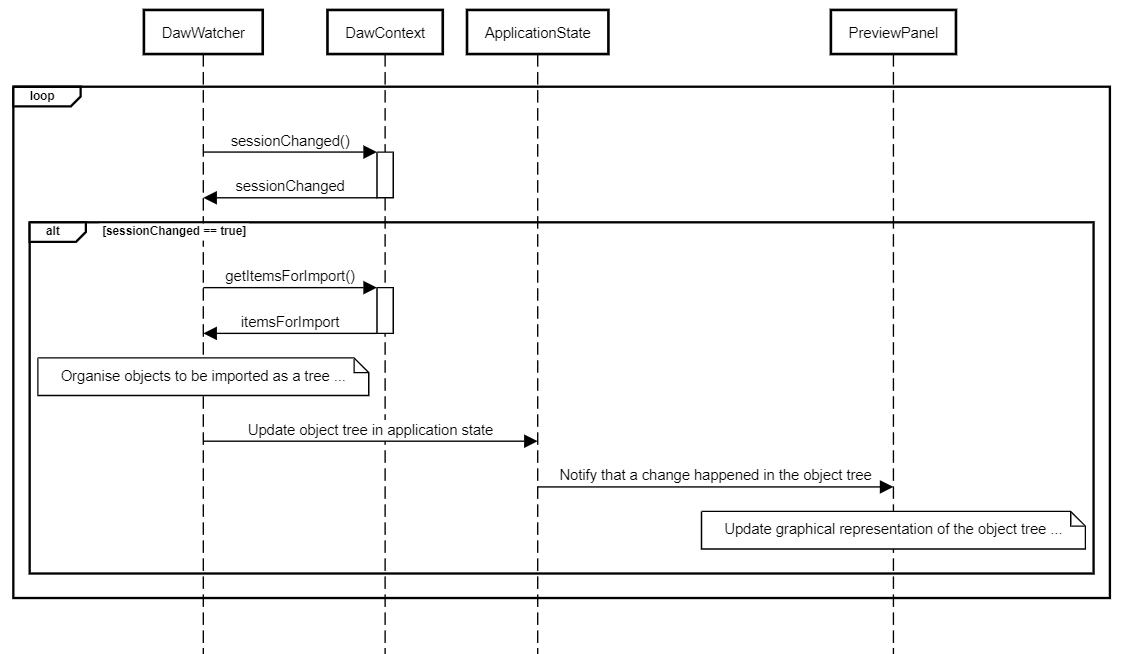
The main component that drives the Preview Panel is the DawWatcher object. The DawWatcher periodically queries the DawContext to know if it should update the content of the Preview Panel. It’s also notified by Wwise if something that could influence the preview has changed. In the case that the Preview Panel needs to be updated, the DawWatcher fetches items to be rendered from the DawContext and object information from Wwise. It then compiles everything together to produce the preview that is then sent to the Preview Panel.
The DawContext is an interface that represents the DAW. It’s the way code in WwiseTransfer_Shared, like the DawWatcher, gets information such as file paths, session information, and session state from REAPER. Code in WwiseTransfer_Shared is unaware of REAPER. You could potentially implement DawContext to interface with another DAW or application.
In ReaWwise, the concrete implementation of DawContext is ReaperContext. You’ll see all the calls to the extension API there.
Below is a simplified sequence diagram that shows the preview panel update process.

Transferring to Wwise
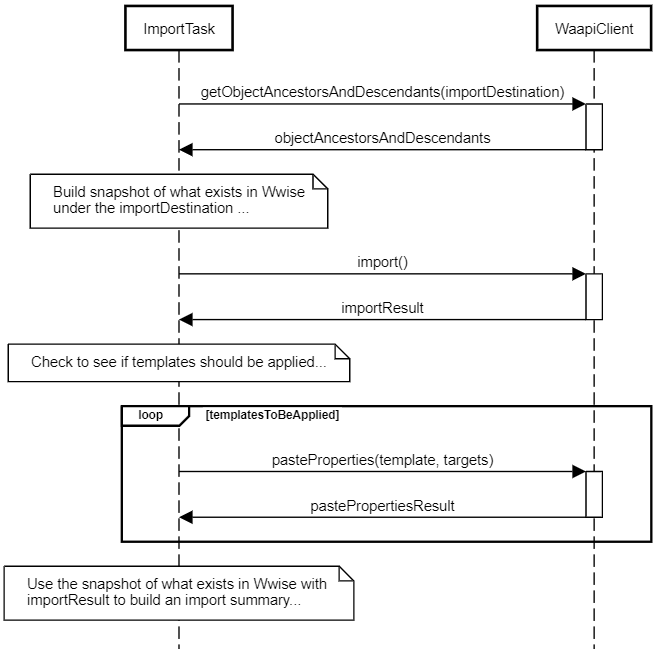
The main component that drives the transfer between ReaWwise and Wwise is the ImportTask object. It uses the WaapiClient object to make several calls to Wwise. It also keeps track of all the details of the transfer, which are then used to create a detailed report at the end of the transfer. The ImportTask is run asynchronously so as not to block ReaWwise’s message thread.
The WaapiClient is a component that is used to communicate with Wwise. It acts as a layer over the AkAutobahn client by abstracting all of the WAAPI request and response management. The WaapiClientWatcher is a component used in conjunction with the WaapiClient and is used to monitor the connection to WAAPI. It periodically checks if the connection to Wwise still exists.
Below is a simplified sequence diagram that describes the import process.

Application State
ReaWwise uses a JUCE ValueTree to store state information and data that needs to be shared across components. This data structure takes the form of a tree and can store many basic data types such as int, string, and bool. For custom data types, special conversion templates can be used. Components can be notified of changes in the data of a ValueTree by registering to them as listeners.
In ReaWwise, GUI components listen to changes in the ValueTree and update themselves accordingly. This allows components to be completely decoupled from each other. It also allows us to keep business logic and presentation logic separate. Below is a simplified sequence diagram illustrating how a text field in ReaWwise shows an error state depending on the validity of its content:

Testing
During the development phase, we experimented with several approaches to testing. The first one was, and still remains part of the project, unit testing. The second approach, which was ultimately abandoned, was end-to-end testing.
End-to-End Testing
The idea for end-to-end testing was inspired by a talk by Joel Noel at ADC21. He presented a new end-to-end testing framework for JUCE applications called JUCE End to end. The tool allows for any JUCE application to be controlled by javascript. It also allows for any JUCE components to be queried. For example, you could trigger a button to be clicked in your application and then check that a confirmation popup has appeared.
In the end, the framework worked well but it was difficult or nearly impossible to get all the components (Reaper, ReaWwise, and Wwise) to work together seamlessly in an automated way.
Concluding Remarks
In this two-part series, we went through the different aspects of application development. From product conceptualization to user experience considerations and interface design, to taking a dive into the technical decisions and software architecture choices that were taken with ReaWwise.
For more insight into the inner workings of ReaWwise, I encourage you to take a look at the code available on GitHub at audiokinetic/ReaWwise.


Comments