"Tell me Why" was released on Xbox and PC and it fully supports 5.1 surround sound. Working on a narrative game involves a specific approach regarding the final mix. We cannot only rely on a full systemic approach because each cinematic or narrative moment is unique and tells the player a specific emotion. We constantly needed to adapt the audio to make the player feel comfortable and not being disturbed by anything.
Mixing Workflow
This approach has some similarities with linear mixing for film. We tried to dive deeply into the mixing process to bring as much detail as possible.
Before going any further, let’s look at a game sequence that illustrates all the points mentioned below.
Overall Cinematic Workflow
We wanted as much freedom as possible regarding our mixing decisions. We decided to work on stem-based workflow with the following structures.
| Stem Name | Channel | Positioning Type | Reverb Type | Center % |
| Dialog | 3.0 | Listener Relative | Runtime | 75 |
| Foley | 3.0 | Listener Relative | Runtime | 75 |
| SFX | 5.1 | Balanced Fade | Baked + Runtime | 0 |
| Footsteps | 3.0 | Listener Relative | Runtime | 75 |
| Ambience Bed | 4.0 | Balanced Fade | Baked | 0 |
This workflow allowed us to be extremely flexible and reduce time-consuming back and forth with Reaper and Unreal because we were able to adjust levels, eq, and reverb per stem in the engine.
Footsteps cinematic management
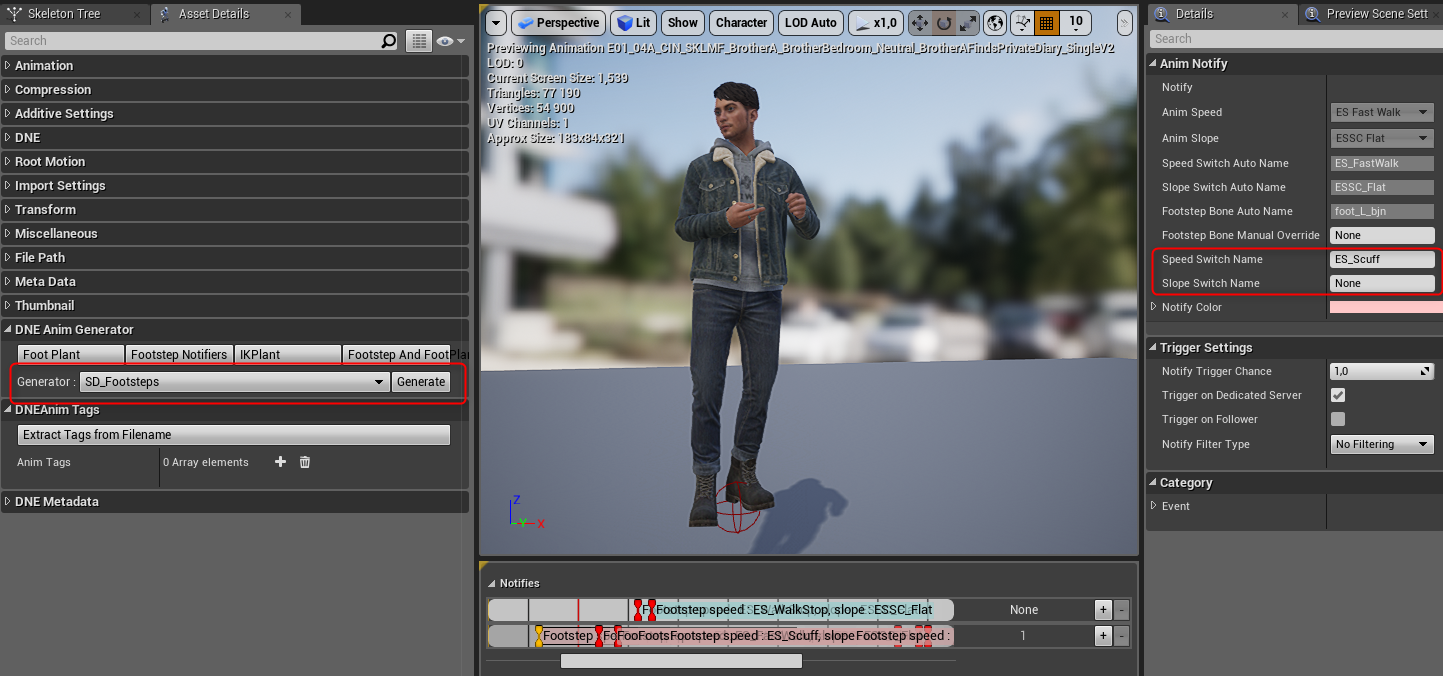
Footsteps for cinematics were managed directly from the animation sequence in Unreal. A custom tool helped us to generate UE Notifies when the foot bone is hitting the ground.
This notification follows the terrain material and triggers the appropriate footsteps switch material. Thanks to that, we did not have to sync footsteps manually in Reaper. All we needed to do was set the correct gesture switch and clean unwanted notifications if too many collisions were detected.
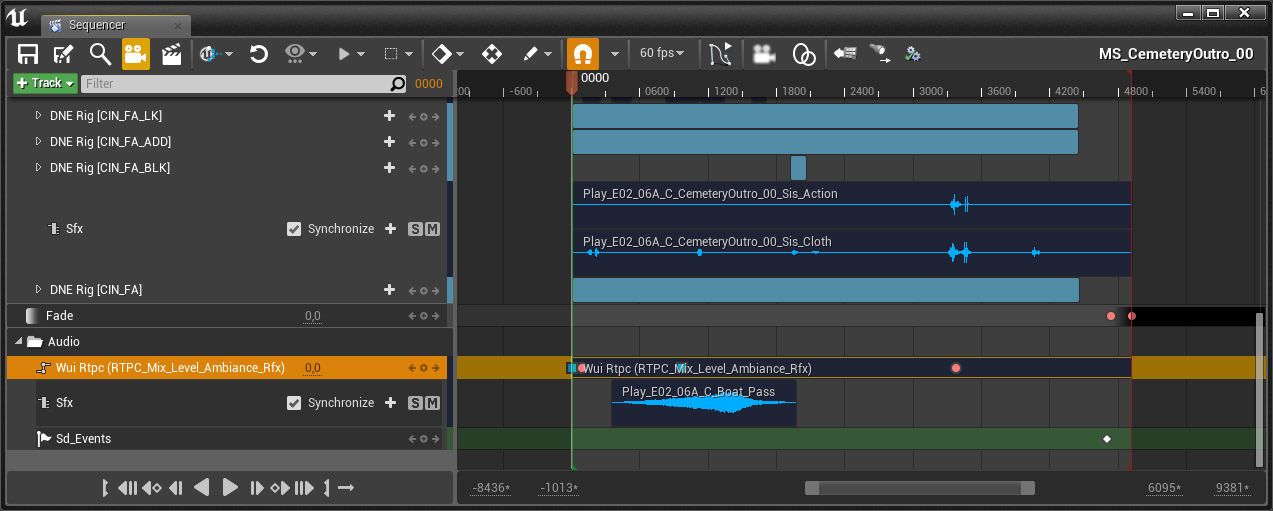
RTPC Track in UE Sequencer
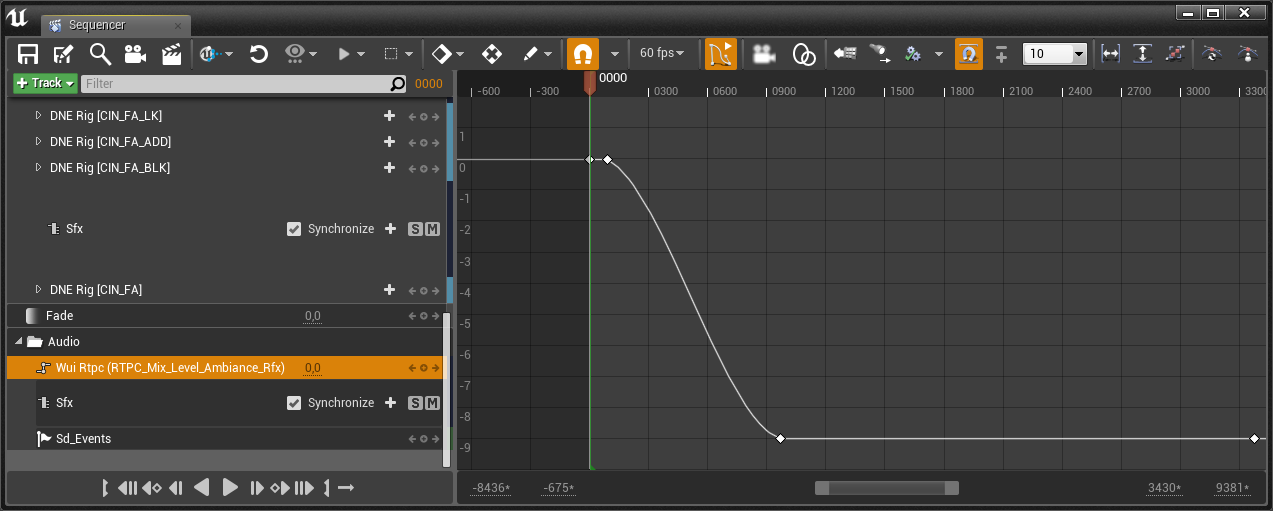
In the video example above, you can hear the level of the clock increasing while Alyson’s stress is getting wild. In this kind of situation, we preferred to use a feature that allows us to drive the level of any bus directly into the sequencer.
We can use the Unreal curve to create precise automation in a cinematic. The RTPC in Wwise is set as absolute dB values so, we do not need to worry about making weird dB conversion. We used this feature a lot on the ambiance and music bus to enhance dialog “presence” or to create tension like mentioned above.
Keeping consistencies on dialogs.
How to deal with several kind of dialogs ?
Dialogs are the core experience of "Tell Me Why" and the player will learn lots of mandatory and precious information during the experience.
There are four types of dialog integrated into the game:
Cinematics: Dialogs played during cutscenes. The player does not have control over navigation and the camera.
Inspector: The player cannot move freely. They can still control the camera and interact with objects inside it but, they will have to exit the inspector to move again freely in the game world.
Exploration: The player has complete control over the navigation and camera.
Bond: The dialogs related to the memories of Tyler and Alyson.
These four types of dialogs required several integration systems in the engine. We had to find the appropriate Wwise settings to make all dialog sound equally throughout the game.
| Dialog Type | Channel | Listener Pos | Center % | Runtime Filter Over Distance |
| Cinematics | 3.0 | Balanced - Fade | 75 | High Shelve EQ |
| Inspectors | 3.0 | Balanced - Fade | 75 | N/A |
| Exploration | 5.0 | Listener Relative | 75 | High Shelve EQ |
| Bond | 4.0 | Listener Relative | 0 | LPF |
Cinematics and Inspector
"Tell Me Why" includes lots of seamless transitions between gameplay and cinematics. We needed to find a compromise between 2D and 3D to avoid too many differences between those two types of game modes.
We used a balanced-fade spatialization driven by an azimuth built-in parameter to modify the front panning of the targeted audio. This covered most of the cases in the game.
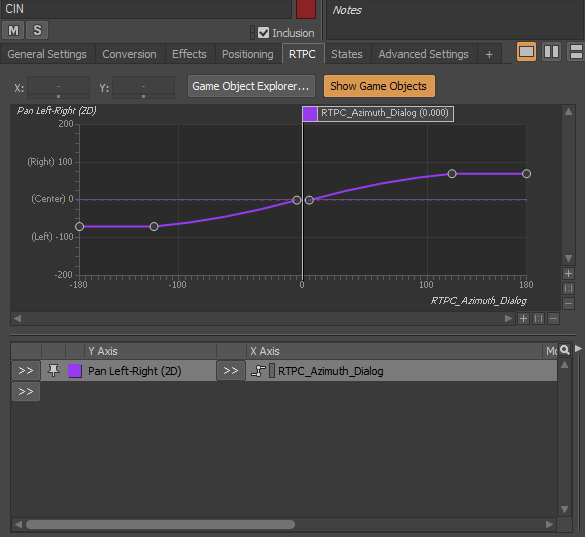
But it was sometimes necessary to fine-tune the min/max panning value to better fit the frame size of specifics camera shots.
You can hear an example of a tweaked panning value in the video example at 1min12. When the cop’s dialogs are getting more and more processed, we also decided to create a hardpan effect on the voice at runtime.
Exploration
We chose to set all exploration dialogs in 3D for both IA and Player. This will help the player to feel the IA and the NPC accurately and realistically into the surrounding field. To achieve this, we also set the channel configuration to 5.1.
With regards to distance-based filtering, we preferred using a high helve shape on parametric EQ to handle high-frequency attenuation relative to the distance. We only used the low pass filter for occlusion because the slope of the LPF filter in Wwise works very well for that kind of feedback.
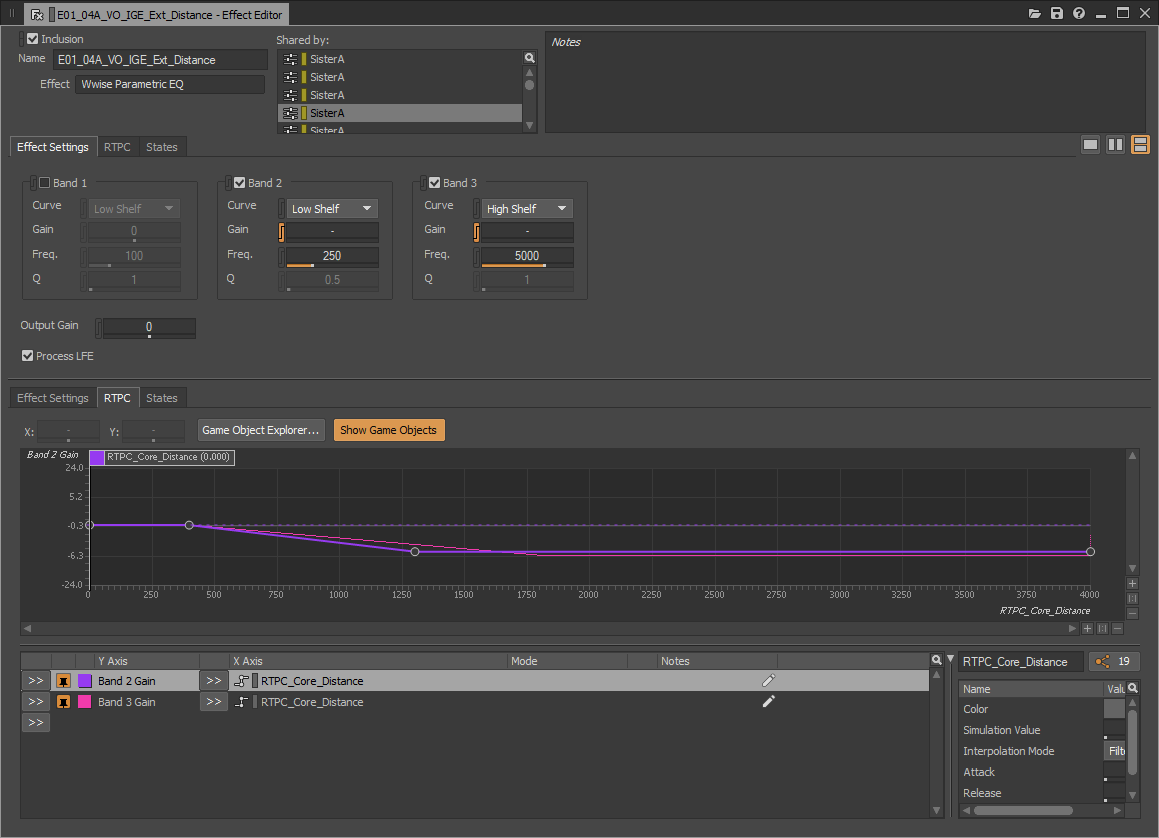
In some situations, we also decided to process the NPC dialog when they are behind the listener. When the NPC is positioned behind the listener but is still closed, we can hear it even though he is not on the screen. From our perspective, it is a little bit weird & disturbing. That is why we chose to process the NPC dialogs with a volume and reverb send level controlled by an Azimuth RTPC.
Bond
Bond dialogs were processed in real-time in Wwise to help with the high volume of voice lines in 5 languages throughout the game. We needed to find processing that could easily fit the wide-range audio spectrum of all these different files.
The second reason we proceeded in real-time is that the bond dialogs most often occur during gameplay navigation. Dialog intelligibility was part of the bond gameplay mechanics and we needed to alter the dialogs in real-time when the player is out of a range specified in code.
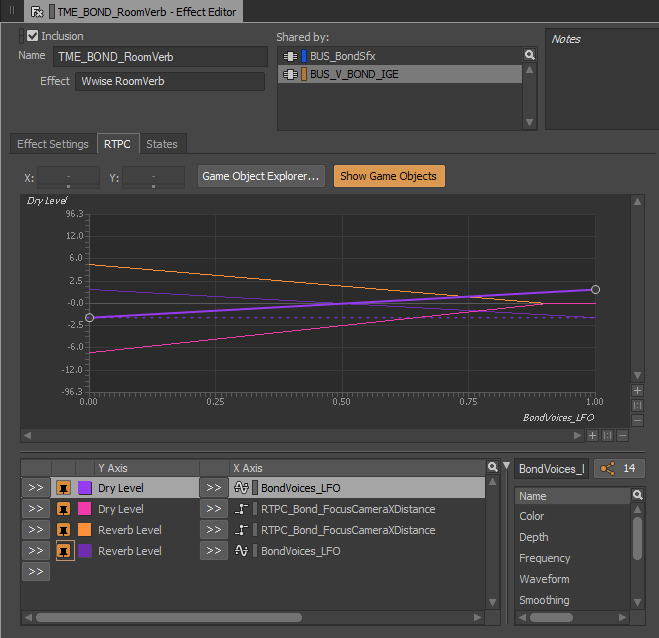
We ended up with a slight reverb and delays. Once again, we used our lovely LFO's on the dry and wet levels to bring more variations on the effects.
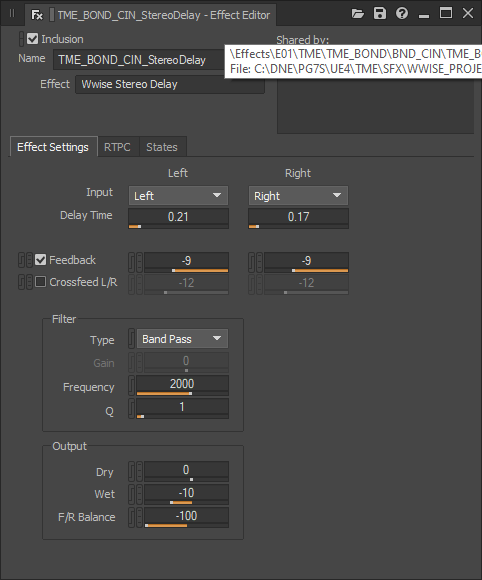
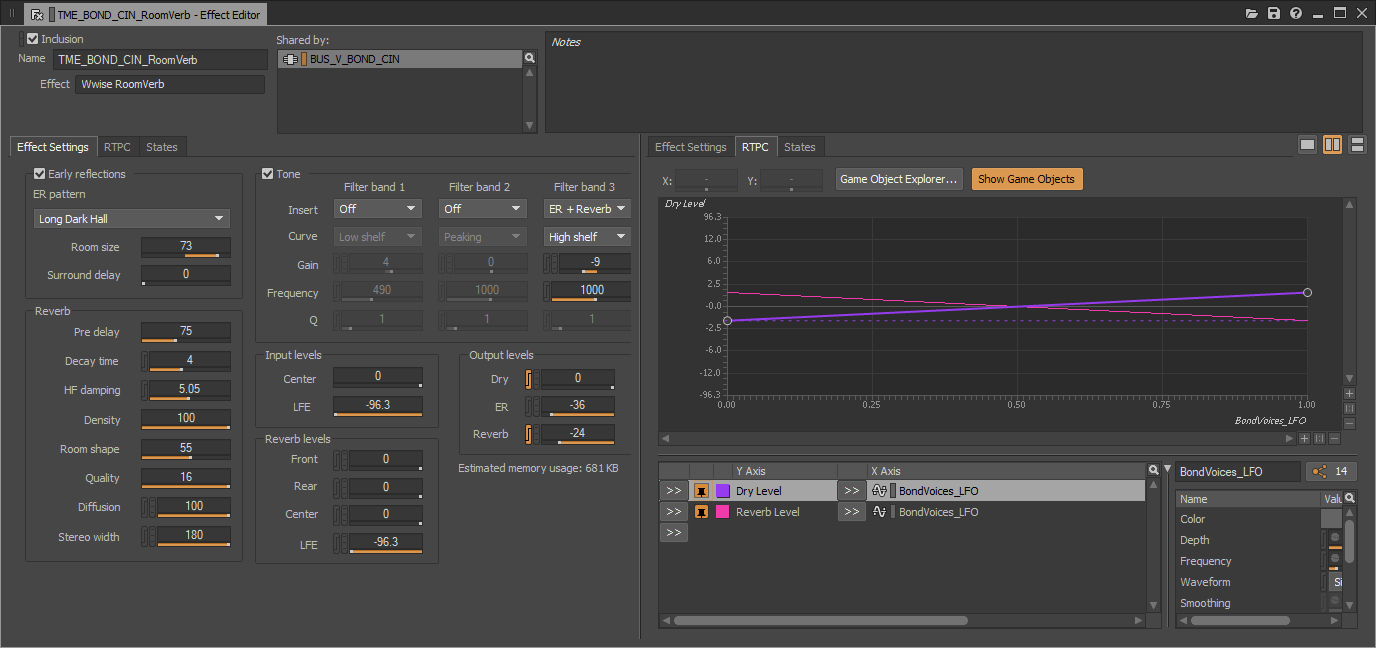
How keep the player undisturbed during intimate moments?
Since the ambience playing during the cinematics are the same as during gameplay, we often had to deal with unwanted random fx playing during cinematics. No one wants to hear a raven or a chainsaw during an intimate moment between Alyson and Tyler. To avoid that behavior, the code sends to Wwise a state which defines if the player is in a cinematic state or not. Then we use this state on volume to remove unwanted sounds during cinematics.
Another common annoying issue during cinematics is the volume inconsistencies of 3D sounds and ambience beds during shot-reverse shots.
We had great tools to manage that.
The first one is a dedicated sequencer track that allows us to freeze the listener position during cinematics. This keeps its location & rotation even though the camera is going away.

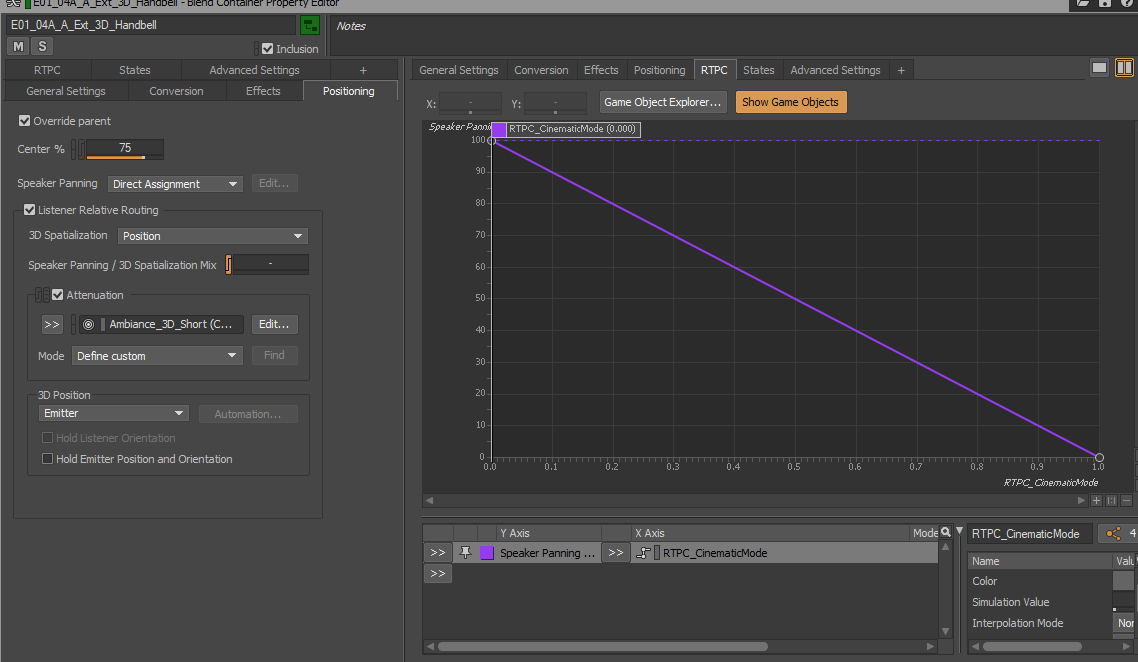
But sometimes some cinematics will require the listener to follow the camera as usual. In this situation, we use the cinematic state mentioned above to drive an RTPC that will change in Wwise the Speaker panning ratio. This trick allowed us to select which sounds we wanted to spatialize during cinematics.
Lockdown and mix check in domestic environment
The pandemic lockdown was, of course, a big issue during the development of Tell Me Why because we spent three months working in a domestic environment instead of our mixing room. We had to think about a workaround that would help us to be ready for the final mix session.
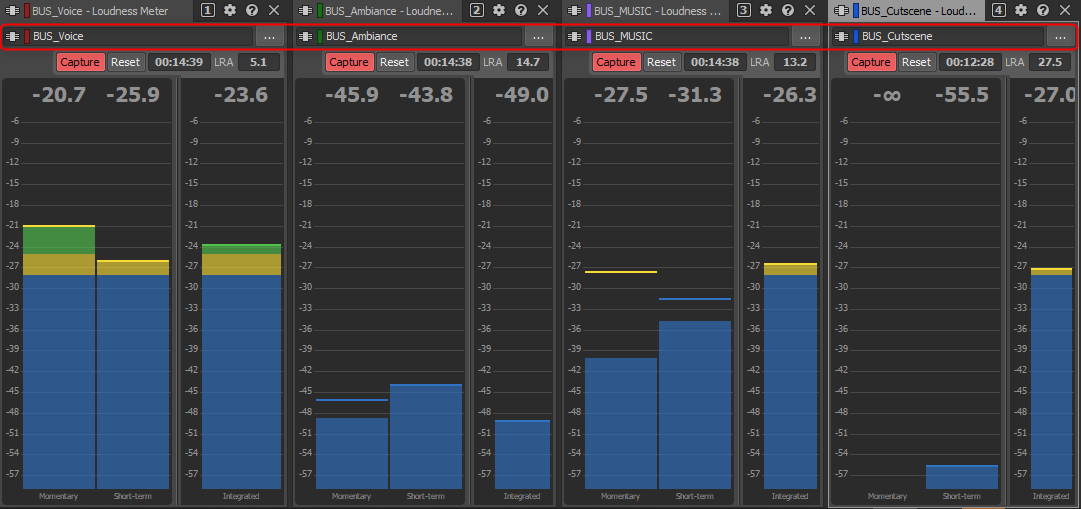
We usually do the final mix with calibrated speakers at 75 dB SPL. Although this value is suitable for pro studios, 75 dbSPL is too loud for your neighbor or people living in the same apartment. Using headphones was not an option for the reasons we all know. So, we took the risk to mainly rely on the Wwise Loudness Meter.
We decided to monitor the loudness as often as possible of our four main buses at the same time. Wwise’s Loudness meter lets you choose which bus you want to analyze, so this is a great way to check if ambiences and dialogs between different scenes remain consistent. This workaround will not replace a full-time review and mix, but it is efficient to approach the final mix with serenity. It helped us to polish the final mix at the end of the lockdown.
Mastering
Dynamic Range
"Tell me Why" is a game where the audio dynamic was difficult to manage. A lot of the environments are very quiet, and we did not want to use too much compression on the dialog to keep all the subtle variations of the voice acting. Quiet environments such as room tones or air beds are easy to manage when listening on a large studio monitor. But we noticed that the settings we made on our studio monitor did not fit the small TV speaker.
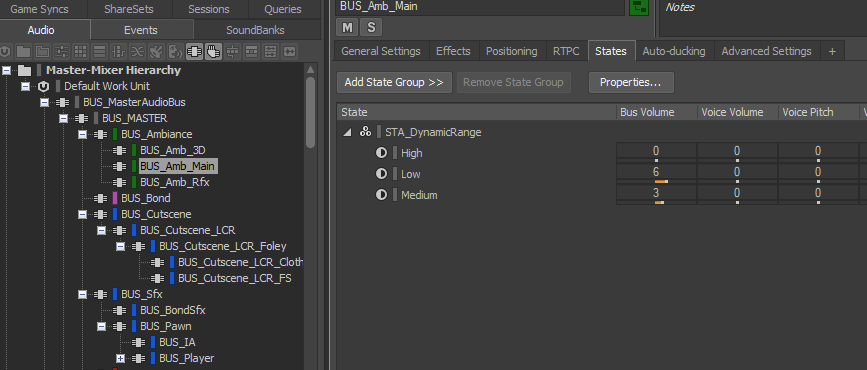
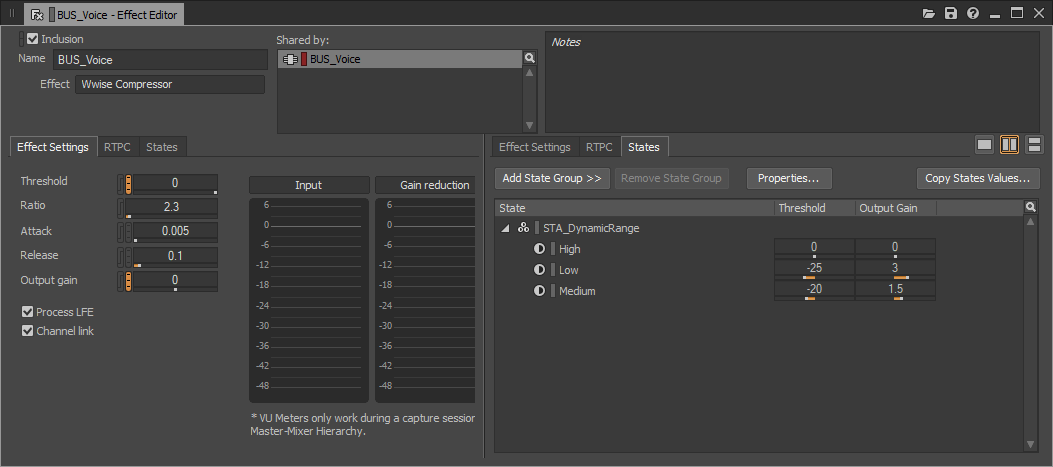
We decided early in production to try to find a way to keep our intentions despite all the most common player’s audio setup. We used a very simple system based on states to change the volume and compression threshold of our main buses. The goal is not only to modify the level of these main buses but also to control the dynamic of each one, and to change the balance between them.
This system allowed us for example to raise the volume of the ambiance only on a small speaker configuration. Then the player only needs to select its speaker configuration in the options menu.
Three speaker configurations are available:
Low: Suitable for built-in tv speaker.
Medium: Suitable for middle-range size speakers such as tv soundbar or small 2.1 kits.
High: Suitable for large size speakers especially in surround set up.
Here is an example of bus volume modifications related to the dynamic range options:
| Ambience Bus | Music Bus | Foley Bus | |
| Low | + 6db | + 2db | + 2db |
| Medium | + 3db | + 1db | + 1db |
| High | None | None | None |
This is an example of compressor’s threshold modification:
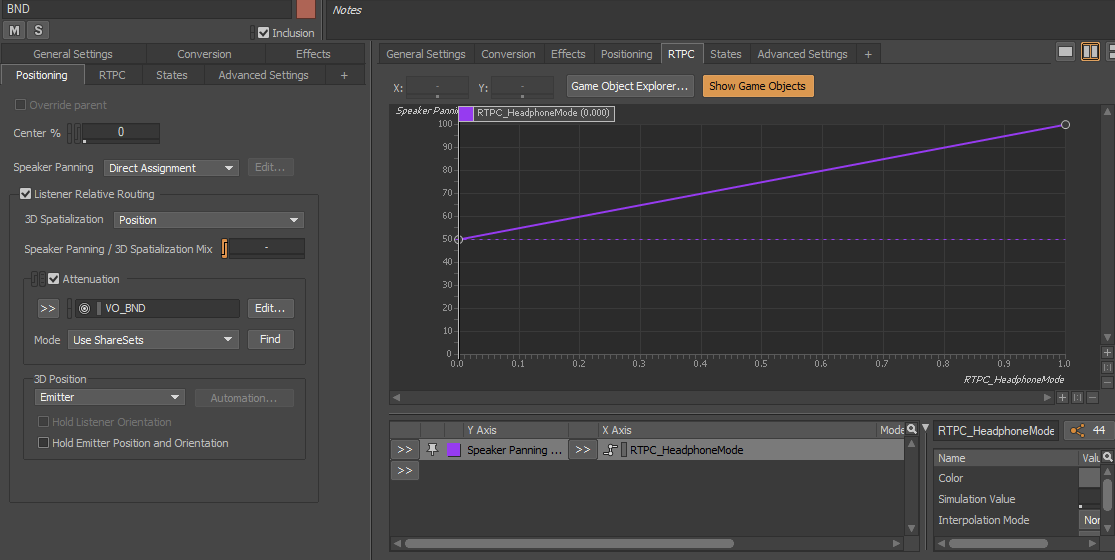
In addition, we provided a Headphone Mode which changes the default panning rule and adds more accurate spatialization of some sounds related to the Bond with the SpeakerPanning feature.
Surround to Stereo Downmix
Another common issue we must deal with is the difference of perception we felt between surround and stereo set up, especially on reverb and ambience.
When working in surround for games, we tend to send a lot of signals into the rear channels to enhance immersion. The side effect of this is to get too much signal in the front speaker when the hardware platform applies its downmix rules.
The Windows 10 and Xbox platforms use standards ITU downmix coefficients as mentioned in the following scheme:
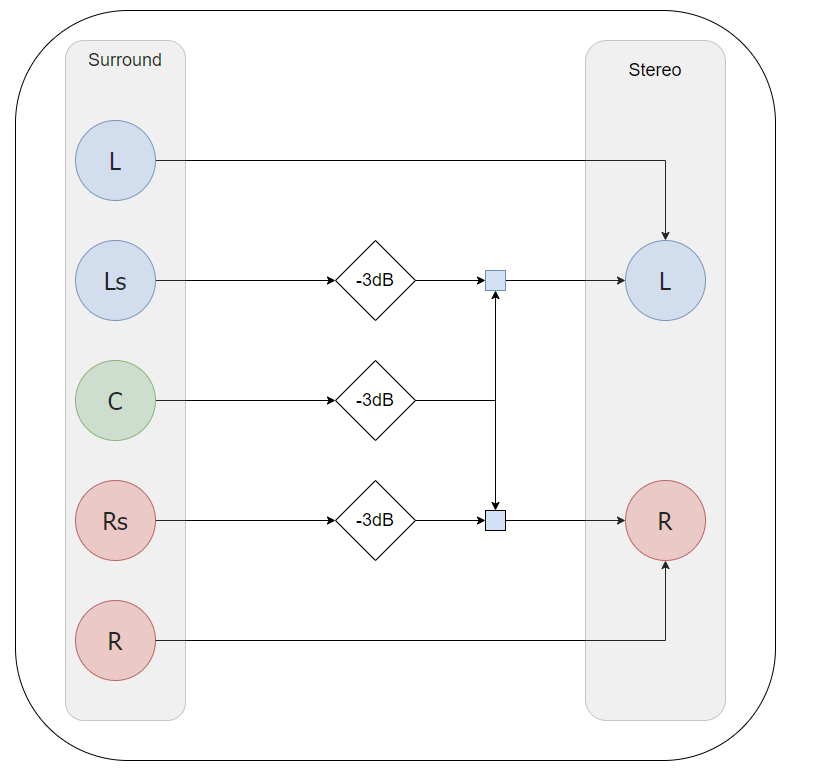
For "Tell Me Why" we wanted to get rid of these recommendations and try to apply custom coefficients on buses highly affected by the downmix such as reverb and ambient bus. Thanks to that feature, we no longer had to worry about the stereo downmix.
We used the GetSpeakerConfiguration function from Wwise to automatically detect if the platform is running in 2.0 or 5.1 / 7.1 surround. Then a state gets this information and drives the property we want to modify. This system works at runtime so, it will follow all the changes the player will make on their hardware.
To polish the system, we developed a custom plug-in that handles the discrete channels of a bus. All we need to do is to insert the plug-in on the bus we want to process and apply volume attenuations. In the following example, we applied a 12 dB attenuation on the rear channel of our reverb bus.

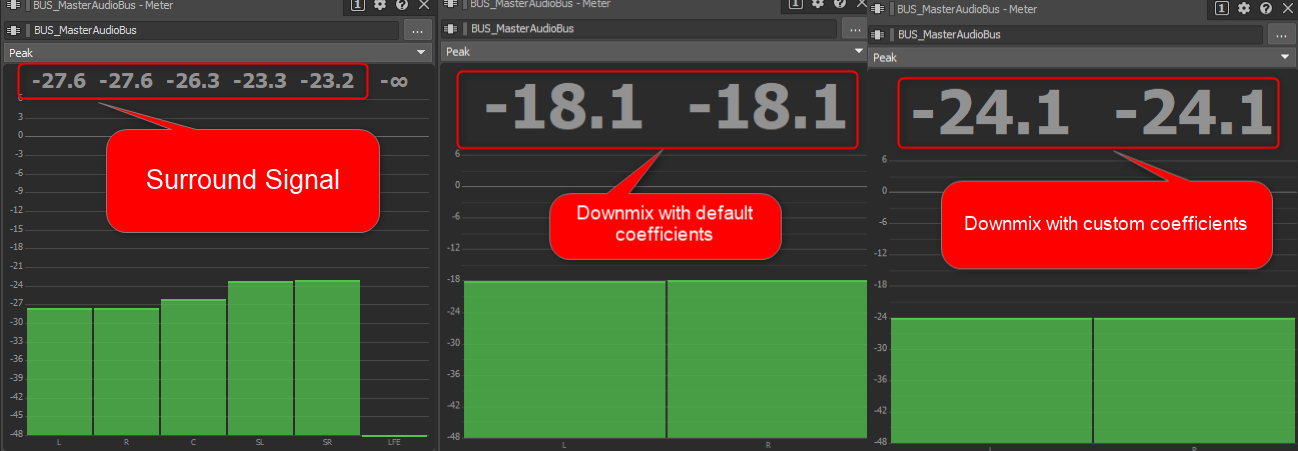
The following measurements made at runtime shows that our custom coefficients helped us to reduce volume overload during worst case scenarios when a surround signal is highly fed with both center and rear channels.
|
LOUIS MARTIN |


Comments