Teaching game audio to distance learners isn’t easy. Teaching game audio to distance learners without sight is even more difficult. That was the challenge presented to us, the game audio instructors in Full Sail University’s Audio Production and Recordings Arts bachelor’s degree programs. We recently succeeded in teaching our first ever online student with complete blindness how to use Wwise on a Mac. This took the combined efforts of several instructors and the creation of some custom assistive tools to pull off. Here’s how we did it.
The Challenge
Students enrolled in the Audio Production online bachelor’s degree program at Full Sail University take courses in a variety of audio related subjects. Four of these courses deal with designing sound for games and implementing audio with Wwise. When Brian Smithers, Audio Production Program Director, first told us that we would be enrolling Andre Woods, a student with total blindness, those of us teaching game audio courses had some concerns. Teaching Andre how to mix music seemed straightforward. Teaching him sound design for games and audio implementation with Wwise was a different matter entirely.
To complicate matters, Andre would be learning on a Mac, and Mac's VoiceOver accessibility tool cannot speak most of the interface in Wwise, rendering it invisible to a student like Andre. We spent several weeks trying to devise a solution, with various ideas presented including alternative assignments, direct implementation in engine, interactive simulations with MIDI controllers, audio implementation from scripts, and more. It seemed insurmountable, but sometimes the best solution is right in front of you.
The Solution
We eventually found that Andre had an accessibility tool called Flo Tools to assist him in his Pro Tools classes. Flo Tools comprises a set of custom accessibility macros created with the Keyboard Maestro Mac automation tool. If Keyboard Maestro could be used to add accessibility features to Pro Tools, we reasoned, why couldn’t it be used to do the same for Wwise? So, we set out to create our own version of something like Flo Tools for Wwise, with the internal working name “Wweyes”.
This undertaking took approximately 2 months of development and testing while also handling our regular teaching duties. We were all working from home and had no ability to test the macros outside of our own individual computers. The greatest challenge was for sighted instructors to imagine blind accessible workflows. How would Andre navigate? How would he get audible feedback to know when processes were completed successfully? What were the key functions needed to complete each assignment? All these things had to be figured out, and quickly. The plan was hatched in late January, and Andre was scheduled to take our first game audio course in April.
The Macros
Navigation
The first thing we needed to figure out was how Andre would navigate in Wwise. VoiceOver can speak the main window titles in Wwise, but that’s all. We knew he would spend most of his time either in the Audio tab or the Events tab. Department chair Thomas Owen, who teaches the game audio portfolio course for the Recording Arts campus degree, suggested that we make these two areas the main reference points—home base—bound to simple commands such as CMD+1 for the Audio tab and CMD+2 for Events.
We knew Andre would primarily work in the Default Work Unit within the Actor-Mixer Hierarchy, so the first macro was created to automatically select the Audio tab, followed by the Actor-Mixer Hierarchy, then the Default Work Unit. The macro also needed to automatically expand all descendants to reveal hidden elements in the hierarchy. This worked by first scanning the screen for a target image of the Audio tab, and if successful, it then executed the additional functions and provided confirmation to Andre. Audible feedback was provided via system sound effects and text to speech.
 Figure 1 – Audio Tab/Actor-Mixer Hierarchy/Default Work Unit Macro
Containers
Once in the Actor-Mixer Hierarchy, Andre needed to create folders, containers, and objects. While built-in keyboard shortcuts exist in Wwise for these functions, they would not provide audible feedback. Our solution was to create custom shortcuts that would click on the appropriate toolbar icon, then provide audible feedback on completion via text to speech.
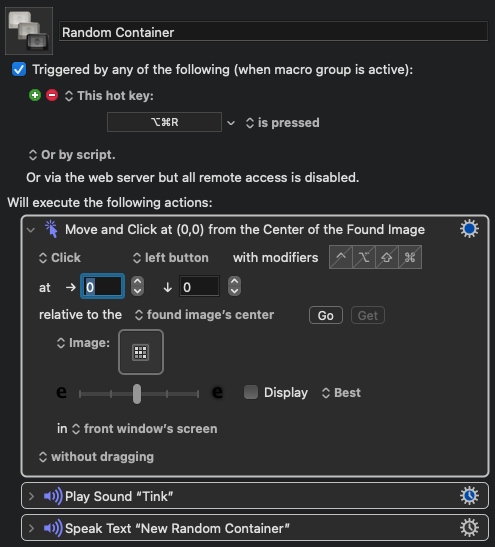 Figure 2 - Random Container Macro
Creating containers is one thing, but we also needed a way for keystrokes plus container names and types to be spoken.
To hear each keystroke, individual text to speech macros had to be created for every letter and number key. Andre would then receive feedback while typing to ensure proper naming and spelling of containers.
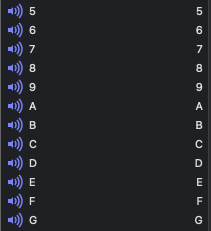 Figure 3 - Number and Letter Macros
To identify the name of a selected container, Andre needed to copy the name to the clipboard as text. Clipboard contents could then be read via text to speech in Keyboard Meastro.
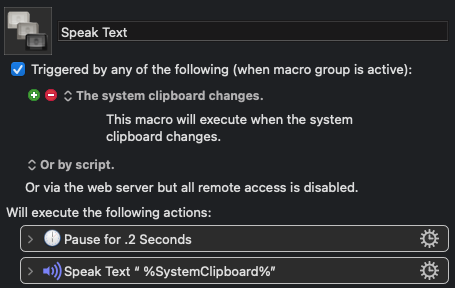 Figure 4 - Speaking the System Clipboard
To identify container types, the screen was scanned for the far-left edge of an active selection, then a series of conditional statements were used to identify the container’s unique icon. Once the icon was identified, its name would be read back to Andre. He could identify the selected container type by using the command OPTION+COMMAND+I.
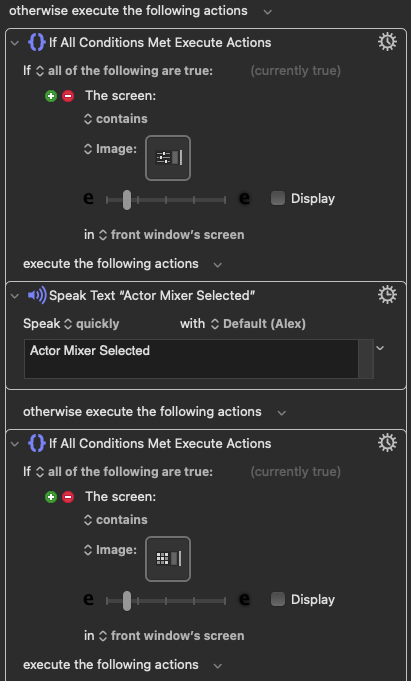 Figure 5 - Container Type Conditional Statements
Importing Audio Files
We retained the built-in shortcut for importing audio files, SHIFT+I, and relied on VoiceOver to speak the Audio File Importer window title. Andre was taught a workflow of first creating the container, then importing the audio files as children. Selecting a group of Sound SFX objects in the hierarchy, then creating a parent container, was deemed impractical in this case.
In the Audio File Importer window, string commands were used to add and import files. Given the sheer number of commands that were needed in total, it was not feasible to rely on modifier hot keys alone. Outside the hierarchy, string commands were used starting with the prefix “W W”. In this case, “W W A D D” to add files, and “W W I M P” to import. After choosing to add files, Andre used VoiceOver to navigate the Finder and select the desired files. After import, all descendants are automatically expanded to expose them in the hierarchy.
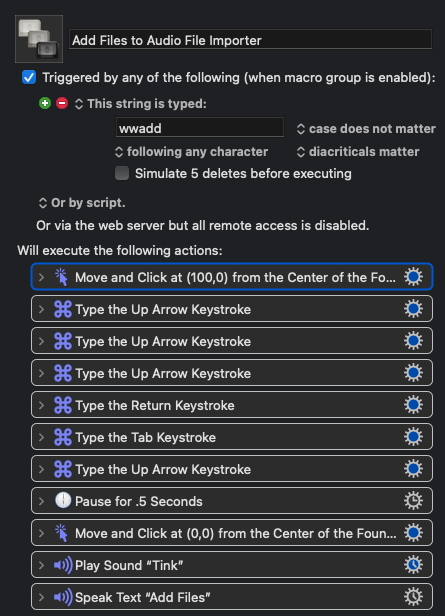 Figure 6 - Add Files Macro
Configuring Containers
Additional macros were needed to configure container settings. Students need to adjust the Play Mode and Transitions settings for their projects. With a random container selected, Andre could press OPTION+COMMAND+C to select continuous play mode, OPTION+COMMAND+L to toggle loop mode, and SHIFT+COMMAND+D to set transitions to Delay type. Audible feedback would then indicate to enter the duration in seconds.
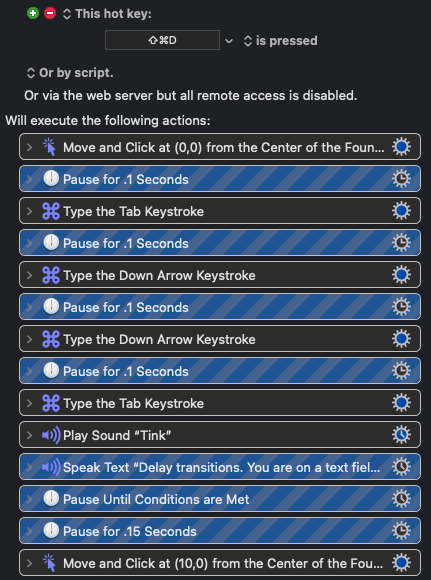 Figure 7 - Delay Transitions Macro
To configure a Sequence Container, Andre needed to first navigate to the Contents Editor using COMMAND+E. This macro automatically selects the first item in the Contents Editor. He would then need to speak the name of the current selection using COMMAND+C. This would identify the selected item, but also copy it to the clipboard for pasting into the playlist. OPTION+COMMAND+P automatically clicks in the playlist area and pastes the copied item in vertical descending order. Andre would then have to return to the Contents Editor and repeat the process for each item added to the playlist.
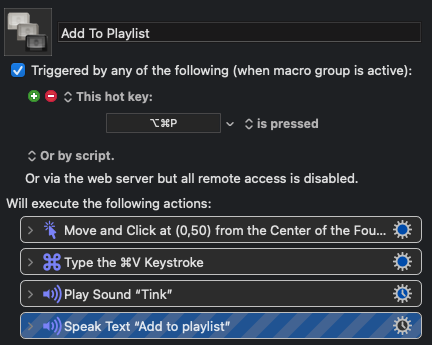 Figure 8 - Add to Playlist Macro
Creating and Targeting Events
To create a new Event, Andre needed to first navigate to the Events tab by pressing COMMAND+2. This automatically selects the Default Work Unit in the Events tab. OPTION+COMMAND+E clicks on the Create New Event button in the toolbar and speaks audible feedback.
Once an Event is created, it needs to be targeted. SHIFT+COMMAND+P clicks on the Add button and selects the Play action. The string “W W B F T” selects the action in the Event Editor, then clicks the Browse button. Once the Project Explorer window opens, VoiceOver speaks the window title. To ensure that the contents of the hierarchy are expanded, the macro automatically right clicks the topmost arrow and chooses “Expand All”. Andre could then use the up and down arrow keys to navigate the hierarchy, pressing COMMAND+C to speak the name of the current selection, typing “W W O K” once the correct target has been identified.
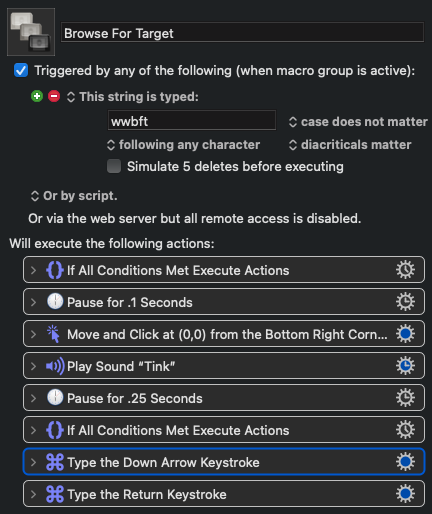 Figure 9 - Browse For Target Macro
The Soundcaster
Once Andre created and configured containers, imported audio files, and created and targeted Events, the Events needed to be added to a Soundcaster session. While a built-in shortcut, SHIFT+S, already exists to open the Soundcaster, the string “W W O S C” was used as this macro does more than just open the Soundcaster. It also repositions and resizes the window to the top left portion of the screen for precise targeting.
Once the window is open, a new Soundcaster Session must be created. The string “W W N S C” executes a macro to click and create a new Soundcaster Session. Andre then needed to enter a name for the session. He could then move his Events to the Soundcaster by typing “W W E S C”. This clicks in the Event Viewer, selects all Events, then clicks and drags the group to the targeted Soundcaster window.
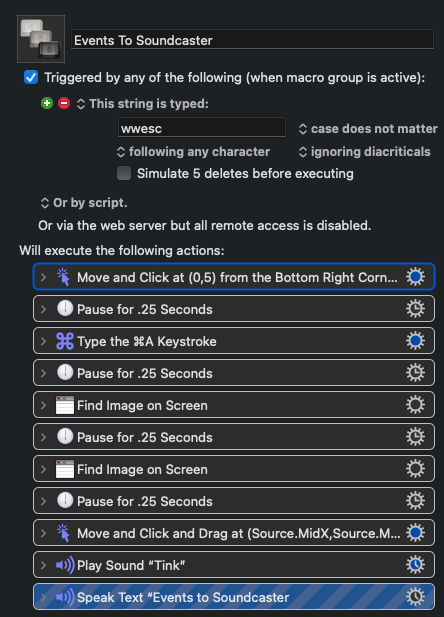 Figure 10 - Events to Soundcaster Macro
To play a Soundcaster Event, the string “W W P S C” could be used. This macro will click the play button for any currently highlighted Event in the Soundcaster. To stop playback, the string “W W S S C” will click the global stop button for the Soundcaster.
SoundBanks
Working with SoundBanks required Andre to first change the layout in Wwise. To do this, he would type the string “W W 2” (“W W 1” would revert back to Designer layout). This string would execute the appropriate action then provide audible feedback. Once in the SoundBank layout, he could navigate to the SoundBanks tab by pressing COMMAND+3 (COMMAND+2 being the Events tab and COMMAND+1 being the Audio tab). The SoundBanks Default Work unit would be automatically selected. He could then press CONTROL+B to create a new SoundBank, which automatically clicks the Create New SoundBank toolbar item.
After creating a SoundBank, it needs to be enabled. To do this, the string “W W E S B” could be typed, which automatically checks the given SoundBank, the Mac platform, and the English language.
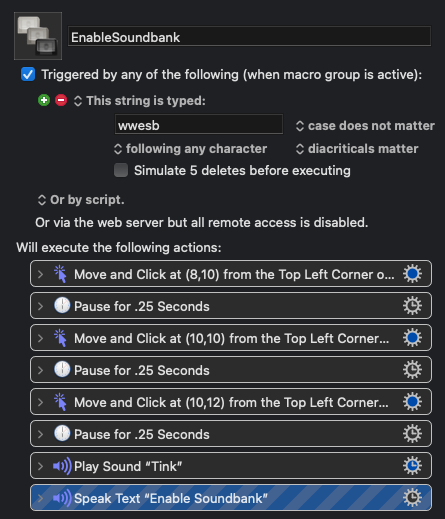 Figure 11 - Enable SoundBank Macro
The Events then need to be added to the SoundBank. For this, the string “W W E T S” clicks in the Event Viewer, selects all, then drags the Events to the targeted SoundBank Editor area.
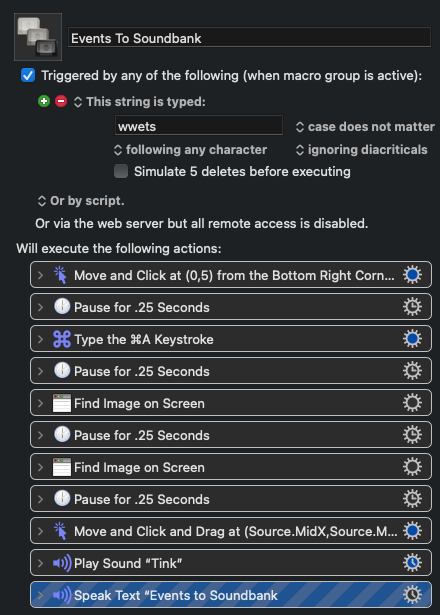 Figure 12 - Events to SoundBank Macro
Andre could type “W W G E N” to generate his SoundBank, which clicks on the Generate All button, completing his project.
Student Reflection
“Even though it was very challenging, I think that it was very rewarding learning how to use Wwise, and I think this will open up doors for blind and visually impaired audio professionals that were not open before these macros were created. I think the macros are amazing and self-explanatory. I am ready to see how far I can go using Wwise and Audiokinetic products in the future.” – Andre Woods
Student Project Examples
The following screenshots show the Wwise projects that Andre was able to complete over the span of our first two game audio courses.
This is the second project in our Sound Design for Games course. Students design and implement a variety of looping and one-shot audio assets for a sci-fi bunker project made in Unreal. Andre successfully demonstrated correct usage of Actor-Mixers, as well as Blend, Random, and Sequencer Containers.
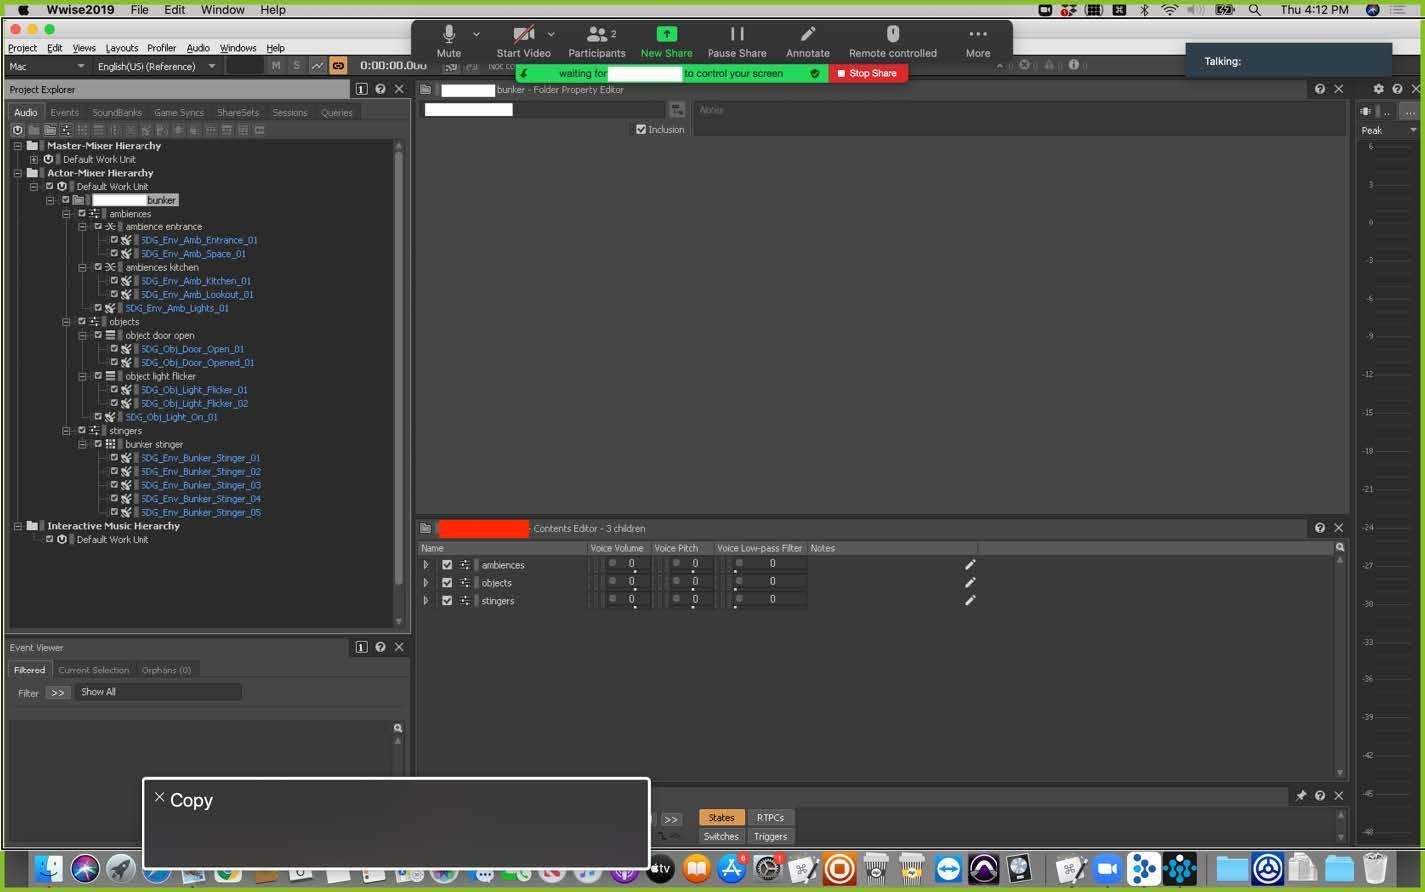 Figure 13 – Student Sci-Fi Bunker Project
This is the final project for the Sound Design for Games course. Andre successfully created virtual folders, looping Sound SFX, Random Containers, and created and targeted play and stop Events that were added to a Soundcaster session.
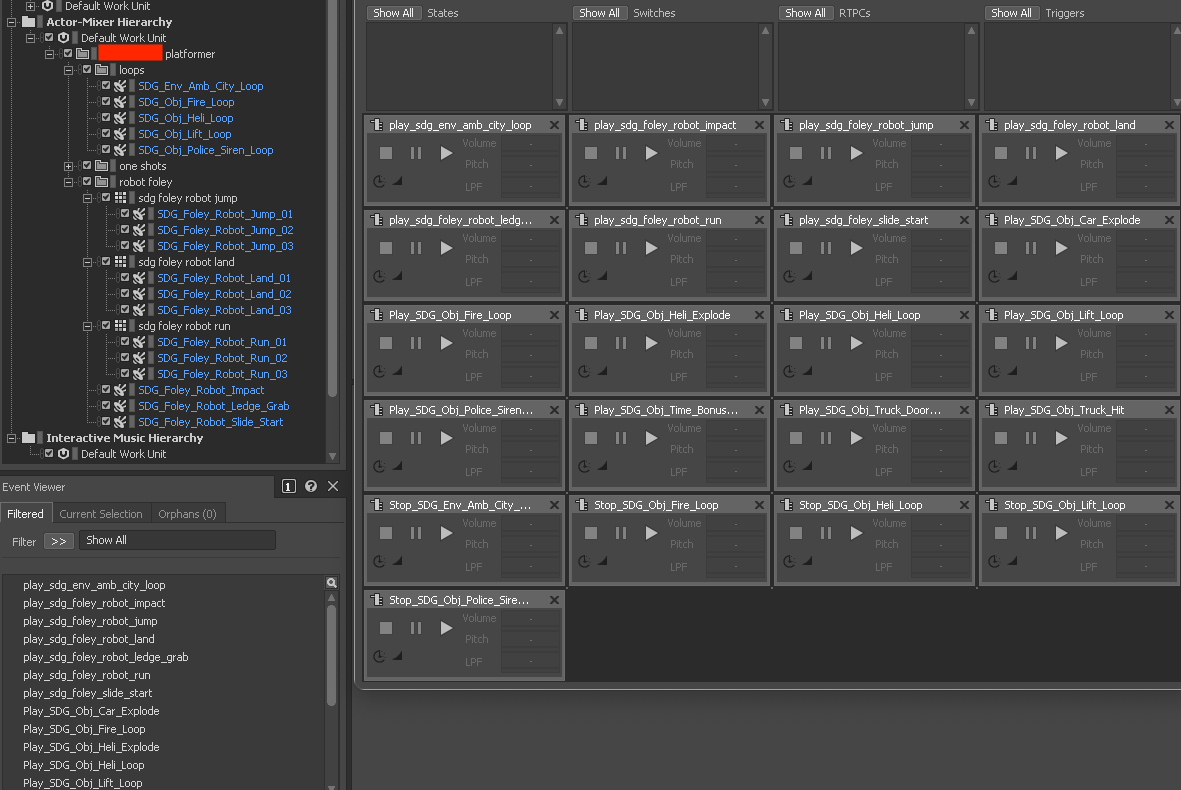 Figure 14 – Student Platformer Project
This is from the Project and Portfolio II: Audio Production course, showing Andre’s implementation of a haunted graveyard Unity project. Andre needed to create and configure Events as well as Random and Blend Containers.
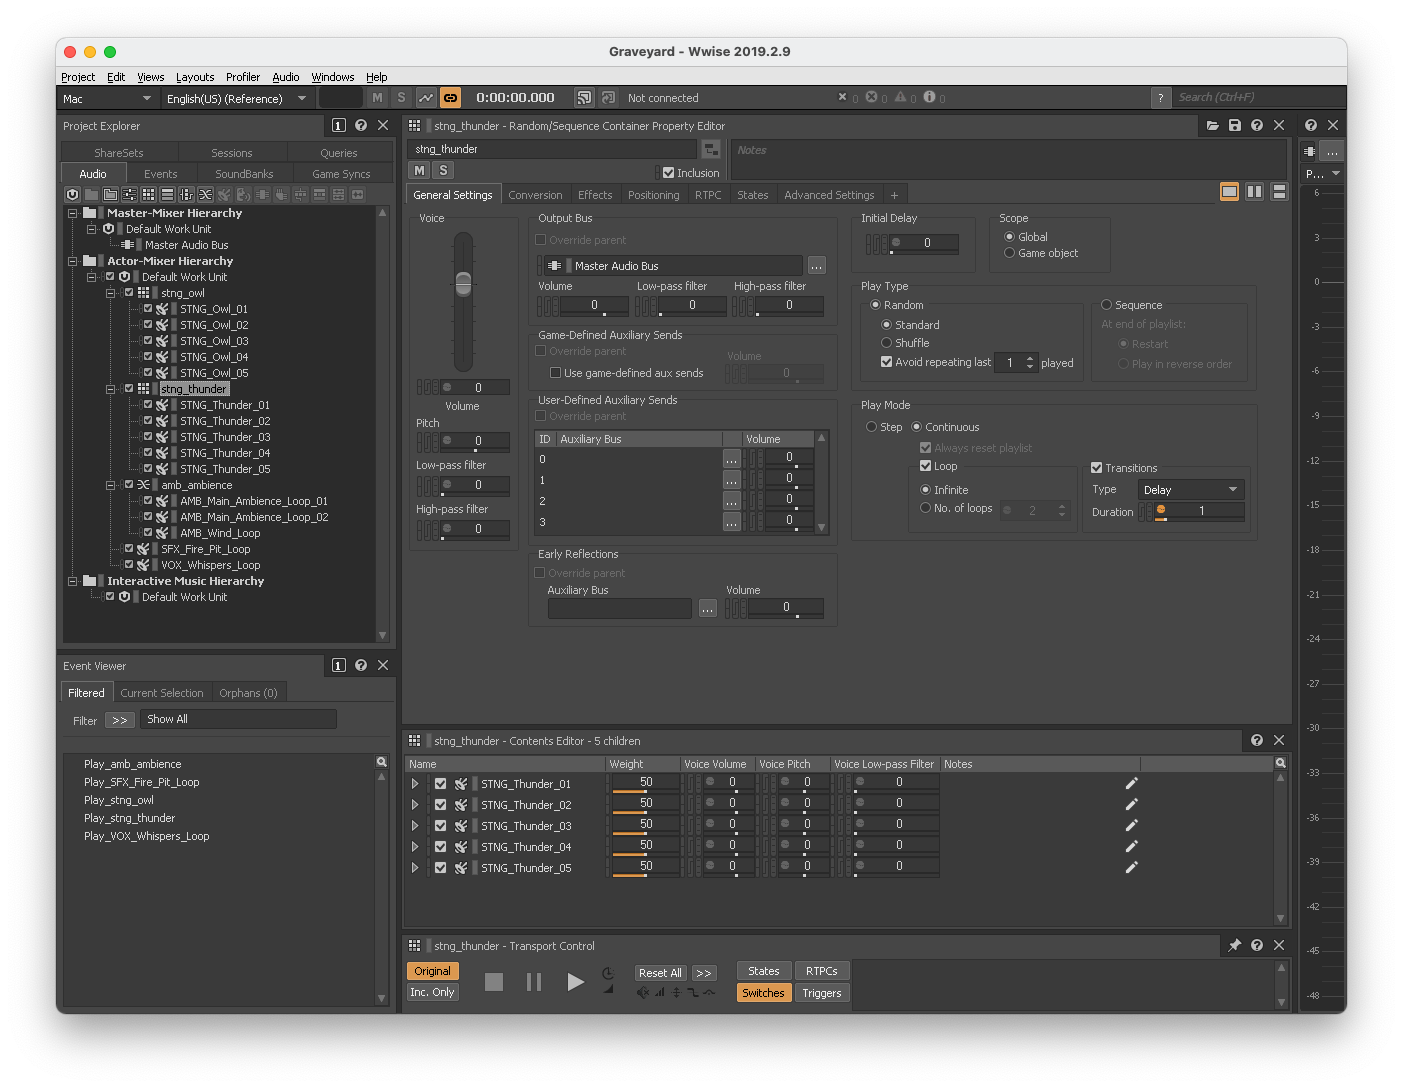 Figure 15 - Student Haunted Graveyard Project
This is Andre’s implementation of a Sci Fi Facility Unity project completed for the Project and Portfolio II: Audio Production course. He created and configured Sequence, Blend, and Random Containers, and created and targeted Events.
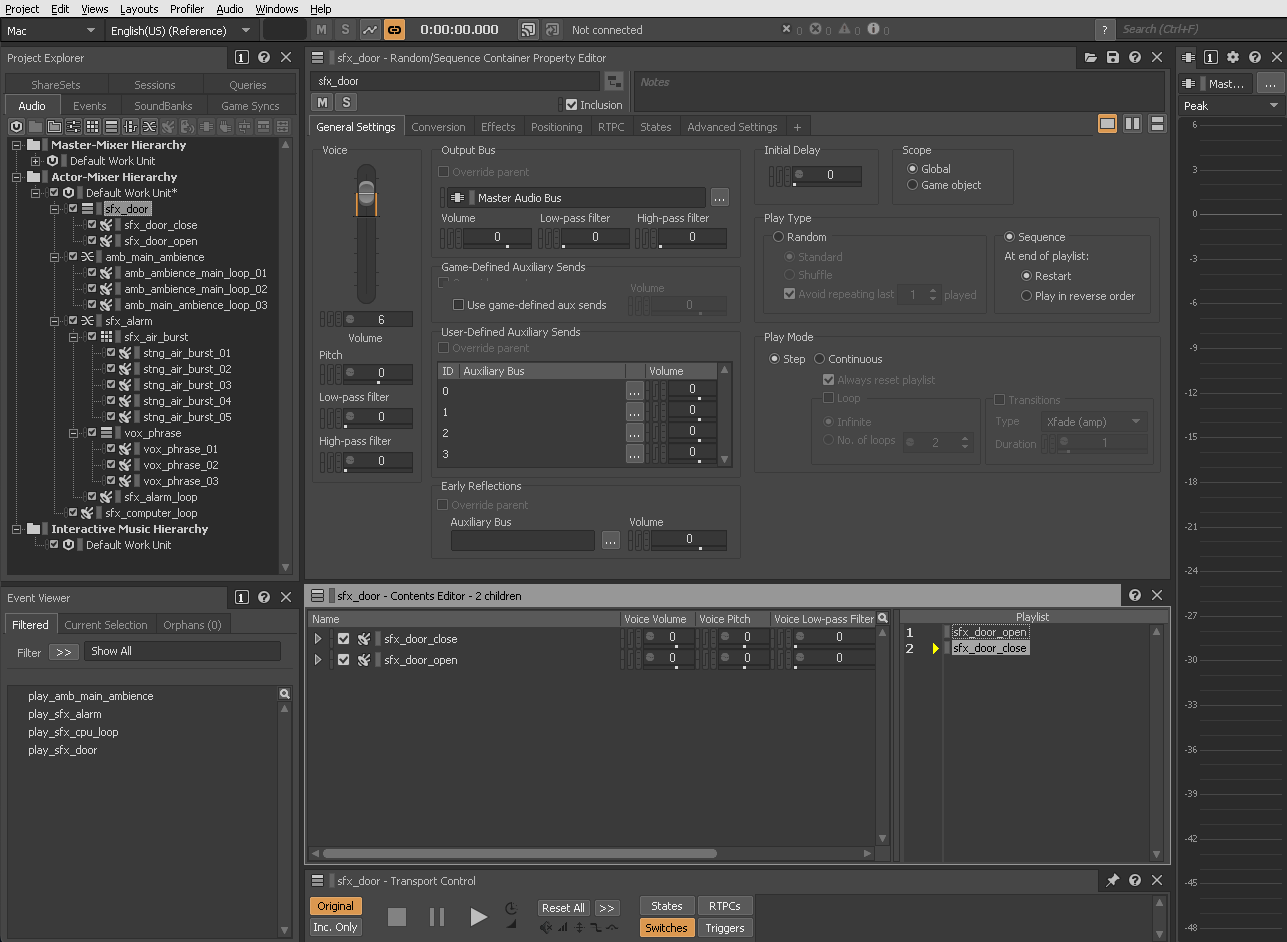 Figure 16 - Student Sci Fi Facility Project
Conclusion
Ultimately, our accessibility experiment worked, and Andre successfully completed our first two game audio courses using the Wwise macros. In total, some 200 macros were created, though only about half proved necessary for him to complete the coursework. We look forward to teaching future students with visual impairment using this system while continuing to refine and improve it.
The macros were created with our specific course requirements in mind and were not designed to be generally useful to all Wwise users. However, we are interested in continuing to research how this type of system could be applied outside our curriculum. While there has been significant interest in game accessibility in recent years, there has been relatively little discussion about accessibility for game developers. We hope that our experience helps further the conversation toward ensuring that all who wish to create games are empowered to do so.
Acknowledgements
Thanks to Andre Woods for being a good sport while putting the macros to use for the first time. He was patient if things didn’t work exactly as expected, and provided helpful feedback throughout the process. Thanks to Lab Specialist Carlos Marquez for teaching Andre how to use the macro tools. Thanks to Course Directors Dale Stump and Marc Pinsky for guiding and teaching Andre in class lectures. Thanks also to Department Chair Thomas Owen for input, guidance, and feedback. Last but not least, thanks to Program Director Brian Smithers, without whom this would not have happened.


Comments