The Doppler effect is the change in the frequency of a wave in relation to an observer who is moving relative to the wave source. This physical phenomenon happens in the propagation of all waves, and sound waves are no exception. As the game audio industry grows, many game engines turn to implement their own Doppler solutions. For example, both Unity and UE have introduced audio features to create the Doppler effect. However, these features are only available within the game engines and cannot interact with Wwise, meaning that you won’t be able to take advantage of them while developing game audio with Wwise.
Recently, I did some research on how to create a Doppler effect with Wwise, and I used UE4 in combination with Wwise to create a demo project to verify my work, comparing the Doppler effects between both of them in the process. Have a look & listen to the results!
Creating a Doppler Effect with Wwise
Let’s check the results under different situations: no Doppler effect, UE Doppler effect, and Wwise Doppler effect.
As you can see, it makes a great difference on the expressiveness of the sound. Without the Doppler effect, you cannot even feel the speed of movement. As for the UE and Wwise Doppler effects, there is almost no difference in their timbres. Only that I positioned the listener on the player character instead of the camera in UE, which created a narrower panning. This is done to make sure the calculation of the player’s position is unified between UE and Wwise, and the Doppler effect won’t be affected by the camera movement.
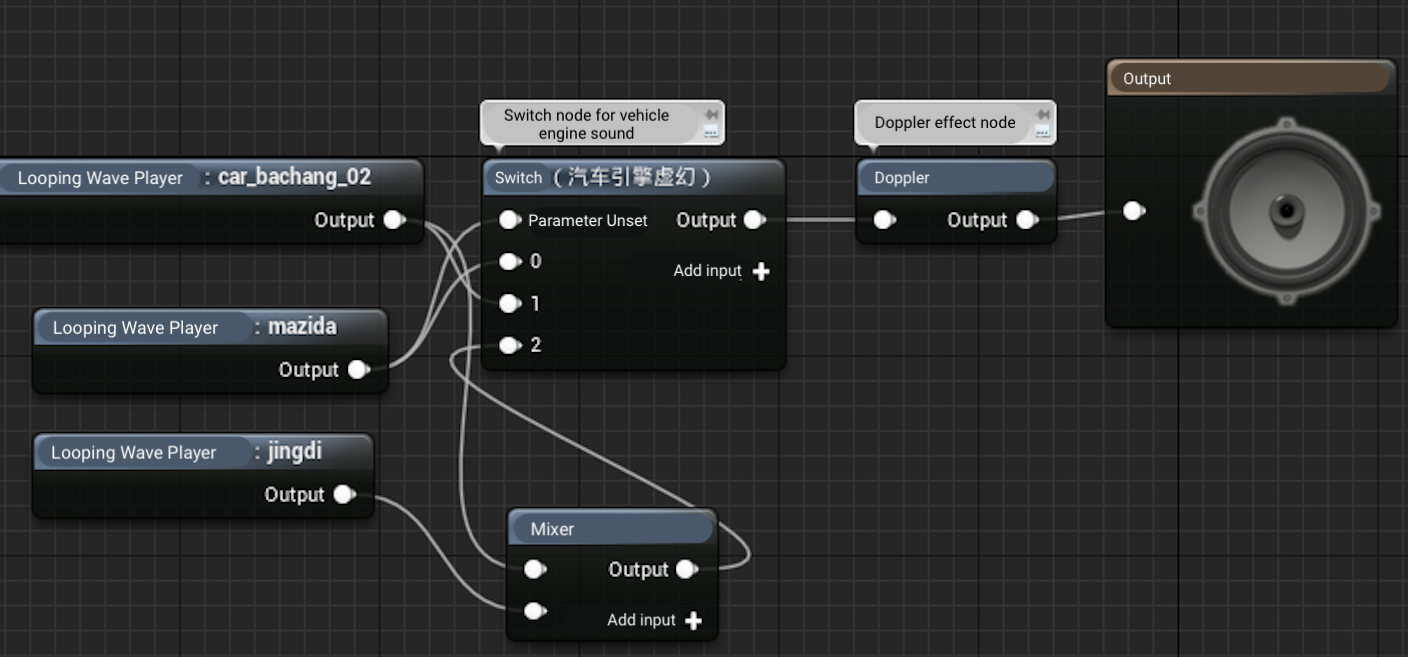
Now, how does this work? Let’s take a look at the audio settings in UE and Wwise:

Figure 1.1: The Doppler effect settings in UE
To create a Doppler effect in UE, you only need to add a Doppler node.

Figure 1.2: The Doppler effect settings in Wwise
In Wwise, you just create an RTPC and make sure all sounds affected have the same Doppler effect as the Doppler node. Now, let me explain how I created the RTPC curve and how it will work.
2. Driving the Doppler Effect with an RTPC
Before setting a Doppler curve, we need to know the physics of the Doppler effect. To avoid ambiguities and reduce variables, let me clarify one thing: In the following sections, when I refer to waves, I'm talking about sound waves. They travel at 340 meters per second in air which remains absolutely stationary. The movement (relative to the air) of all emitters and listeners is slower than the speed of sound (The influence of light waves and Lorentz transformation on the Doppler effect won’t be discussed here). Under such conditions, the Doppler effect resulting from the movement of the emitter and listener follows the following formula:

f’ is the frequency of the sound heard by the listener; f is the frequency of the sound emitted by the sound source; v is the speed of sound; v0 is the movement speed of the listener relative to the air; v8 is the movement speed of the emitter relative to the air.
There are two situations: (1) the emitter stands still, the listener moves; or (2) the listener stands still, the emitter moves. They make a great difference on the Doppler effect. In the first situation, v8 = 0; in the second, v0 = 0. Let’s see how the formula evolves and what curve we can get.

Figure 2.1: The f’-v0 curve when v8 = 0

Figure 2.2: The f’-v8 curve when v0 = 0
Let’s listen to the Doppler effects for both cases.
Now, you can tell there's a big difference between these two cases. And you cannot just ignore one of them or simply derive an average value. It won’t work. To get a convincing Doppler effect, we need to take both cases into consideration. However, using two RTPCs at the same time is not a good choice for future maintenance. We can take the f’/f value as an RTPC variable, instead of using two velocity values. This way, we only need to create one RTPC curve in Wwise. It will be much easier for us to maintain and modify. The pitch and frequency follow a basic rule: One octave up means twice the frequency. This can be expressed in a simplified function curve: y = 2x. However, you won’t be able to create such a curve in Wwise, because only the pitch is allowed to be used as the y axis. By swapping the positions of y and x, we get a new function curve: x = log2y. Now, we know that the speed of sound is 340 m/s, and 1200 cents (the pitch value) equals one octave in Wwise. With this information, we can create a pitch-speed curve in Wwise.

Figure 2.3: Pitch-speed curve in Wwise
Now we have a general idea of how to create a Doppler effect in Wwise. Next, we need to clarify our requirements to the programmers: “I want you to help me calculate the relative velocities between the player and emitter, and put them in the formula to get f’/f, and then send it to Wwise as an RTPC value.”
You can check the following video and see how it works.
Of course, I did this with the help of professional programmers. But what if the programmers are not available or you simply want to do it yourself?
Let’s see how to set the RTPC values.
3. Getting Required RTPC Variables from the Game Engine
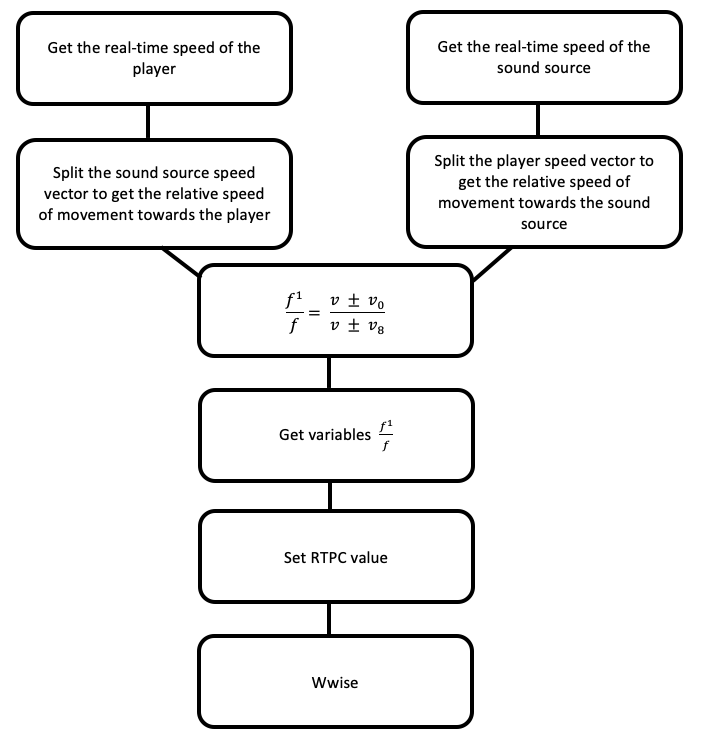
Have a look at the following workflow:
 Figure 3.1: The workflow for getting the required RTPC variables
I don't know much about C++, so I won’t show you the code here. Let’s just take a look at the Unreal Blueprints that I created. The Blueprints simply show how to implement the effects and how to get the required operation parameters. They are not perfectly logical, just for your reference. According to the workflow above, I created the following Blueprint:

Figure 3.2: The blueprint for getting the required RTPC variables
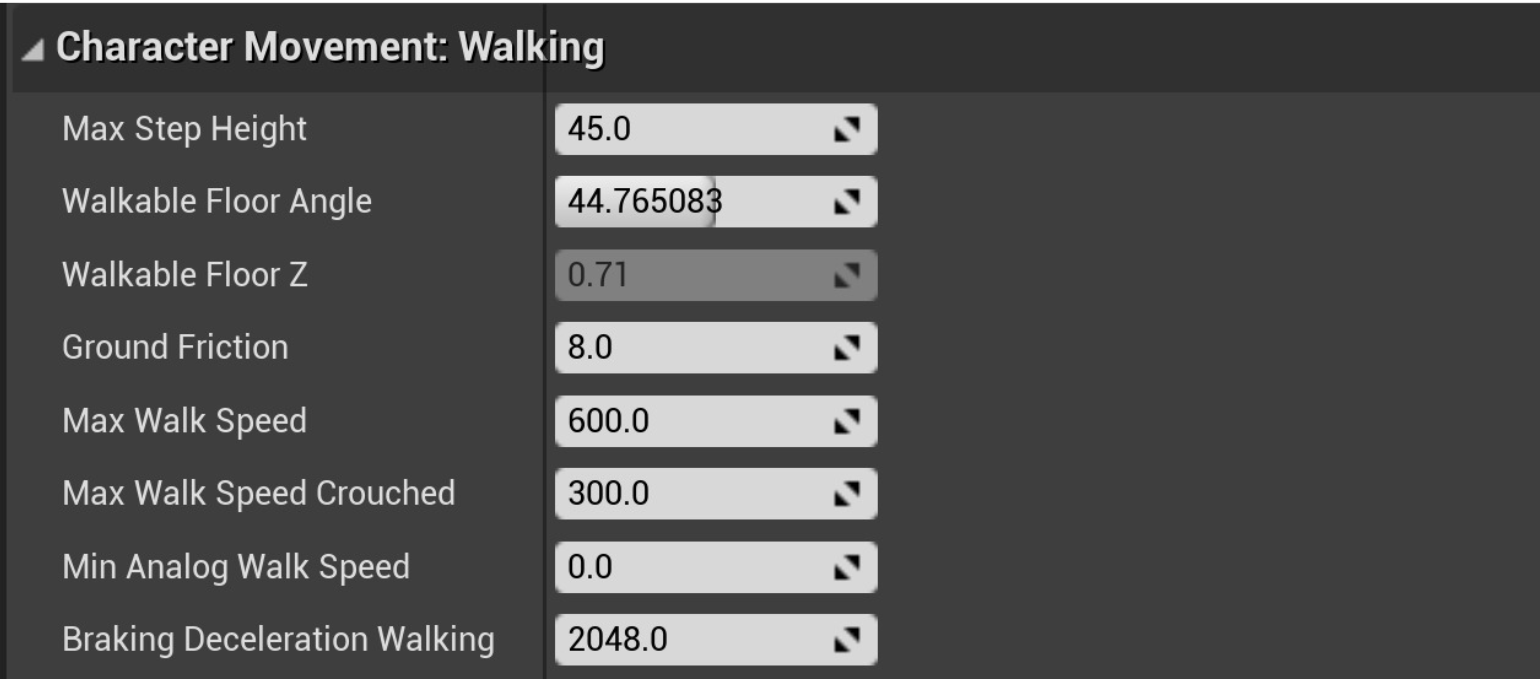
However, there is a small problem here. The Get Component Velocity node only works for components that have velocity settings. For example, the third-person demo game for UE 4 comes with a default player character.

Figure 3.3: The velocity settings for the third-person demo character in UE4
If a component doesn’t have a velocity setting, then the Get Component Velocity node is not readable. In this case, we have to calculate the velocity by ourselves. Here is the Blueprint I created:

Figure 3.4: The blueprint for getting RTPC variables by calculating the movement speed (1)
Here is another one:
.png)
Figure 3.5: The blueprint for getting RTPC variables by calculating the movement speed (2)
Both of the Blueprints read the positions of the player and emitter at each frame, get the velocity vector of the previous frame, then project the vector onto the line between the player and emitter to get a relative velocity, and finally derive the RTPC value according to the formula. However, the former gets the relative velocity by calculating the emitter or listener’s position coordinates at each frame; the latter gets the relative velocity by calculating the emitter or listener’s distance relative to each other at each frame. The difference between the values obtained by these two methods is almost negligible.
4. Adjusting the Doppler Level
All the RTPC calculations mentioned earlier impose a very small load on the system platform. These floating point operations are really insignificant compared to the image processing. However, there could be situations where we don’t want such a high-precision Doppler effect. In this case, we can relax the system load simply by lowering the values and reducing the times of operation. In the Blueprints, I used a Tick Event to drive the RTPC calculation. The Event will take values at each frame. If you don’t want such a high-precision Doppler effect, just create an additional Loop Event to drive the RTPC calculation. The looping interval can be set as desired. We will use that value instead of the Delta Seconds value provided by the Tick Event. The value range should be relatively small. Otherwise, there will be an abrupt change when the movement speed varies dramatically.
In my demo project, I tried many ways to adjust the Doppler level. However, for simplicity, they are not shown here. To better understand the frequency change, the "UFO engine" was set to Helicopter.
There are two ways to adjust the Doppler level: changing the curvature of the curve in Wwise, or modifying the RTPC values. The Doppler level can be controlled at will by multiplying the resulting velocity value by a desired factor. Note that the Doppler level and the velocity follow an inverse proportional function. It’s slightly different from how UE does it (they don't have the same values.)
Now, why do we want to adjust the Doppler level? Theoretically, the Doppler level is fixed in real life, and it should be the same in-game. Unless you want to change the type or density of the propagation medium. Games in the future may have such requirements. Another great benefit is that you can use different distance units within the same level. Let’s say we have a game in which the player character may swell or shrink. When the player becomes smaller, it moves much slower, and so do the objects interacting with the player. In this case, the sounds are less expressive. Instead of modifying the distance values, it would be much easier to adjust the Doppler level.
5. Interactive Doppler Effects
Interactive Doppler effects provided by the game engine are good, however they’re only applicable to some scenes, depending on the game development and audio design.
Interactive Doppler effects are usually used for subsonic emitters that exist for a long time and emit sounds continuously, such as cars, helicopters, roller coasters, RPG projectiles, etc.
For transonic or supersonic objects, it doesn’t work automatically. If an emitter approaches the speed of sound, the sound pattern changes, and most of the sound it emits will no longer come from its own sound, but from the air friction and shock waves. This involves more complex acoustic theories, which are beyond the capability of the Doppler effect. If a listener exceeds the speed of sound, the sound from the rear can no longer be heard, and the listener itself becomes an emitter. Thus, the Doppler effect cannot fully represent the behavior of supersonic objects.
For supersonic objects in-game, we prefer the traditional asset creation method: the sound assets themselves have the Doppler effect, and you only need to adjust the timing to simulate their behaviors. One of the most common examples is the bullets in-game. Each time a bullet flies by, there is a woosh sound. The speed of the bullet is very fast and players usually won’t feel any difference even if there is a slight deviation in the timing and intensity.
Also, there are sounds with fixed duration and timing. In this case, certain assets can be triggered, instead of real-time calculation. For example, when a 1p player shoots an arrow, we will bake the woosh sound into the shooting samples, instead of calculating the Doppler effect in real time. To get a better result, you need to make different settings according to the actual situation.
6. Integrating the Doppler Effect into Wwise
To create a Doppler effect in-game with Wwise, you only need to get the relative velocities between the emitter and listener, and translate them into RTPC values, then use these values to control the pitch. To translate the RTPC values, we have to obtain the coordinate information of the emitter and listener continuously. Fortunately, Wwise keeps monitoring and capturing these data during game play, in order to calculate the attenuation, spatial audio information, etc. In fact, Wwise itself is already equipped to perform Doppler operations. It’s very much like calculating each emitter’s distance, but with slightly more complex floating point operations. The adaptation for different projects can be addressed simply by adjusting the Doppler level. For example, the basic unit for measurement is centimeters in UE, while it might be meter for other game engines. In this case, we only need to replace the speed of sound (34,000) with 340 for the RTPC calculation. Or, what if the in-game distance unit and the real distance unit is not 1:1? Well, that’s quite easy. All you have to do is introduce a scale factor. This is much like adjusting the Doppler level.
When creating the Doppler effect with Wwise, I was surprised that the engine already had all the prerequisites for such a module. I hope to use customized Doppler tools with Wwise in the future!


Comments